Install social.plus UIKit across all platforms with package managers or GitHub source code
Choose your platform and installation method to get started with social.plus UIKit. We support both package installation for quick setup and GitHub forking for complete customization.
Two Installation Approaches: Use package installation for quick integration, or fork from GitHub for complete control and customization.
// In your AppDelegate or SceneDelegateimport AmityUIKitAmityUIKitManager.setup( apiKey: "YOUR_API_KEY", endpoint: .US // .US, .EU, or .SG)// Register user and present social homeAmityUIKitManager.registerDevice( withUserId: "user123", displayName: "John Doe") { success, error in if success { AmityUIKitManager.presentSocialHome() }}
<key>NSCameraUsageDescription</key><string>Access camera to take photos and videos</string><key>NSPhotoLibraryUsageDescription</key><string>Access photo library to select images</string><key>NSMicrophoneUsageDescription</key><string>Access microphone for video recording</string>
With open-source, developers have more flexibility and greater customization options, allowing you to have complete control over the visual style. Open sourcing allows for more transparency and visibility and enables contributions from a greater developer community in terms of good design, implementation, code improvement, and fixes, translating into a better product and typical development.
If you’ve never used UI Kit, you may skip this step and proceed to the next step. If you’re integrating the UI Kit with an existing project, you’ll need to remove and unlink the managed UIKit from your project before proceeding with the integration.
There are several ways for you to migrate the open-source iOS UIKit into your projects, depending on your workflow. One way that we recommend is via Git Submodule. This instruction assumes that the app project is already set up with a Git repository.1. Add the git submodule of social.plus UIKit open source into your git repository:
2. Create an Xcode Workspace, and then add both MyApp.xcodeproj and AmityUIKit.xcodeproj together under the same workspace.
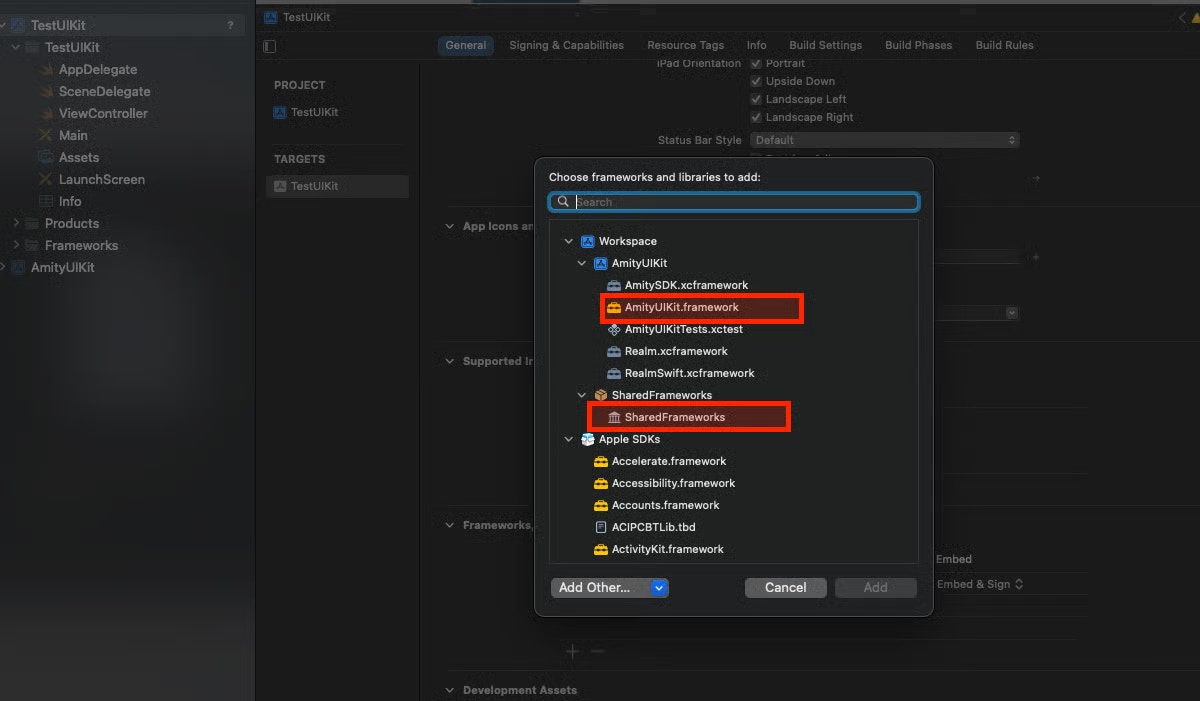
3. AmityUIKit links with other dependencies such as AmitySDK through SharedFrameworks which is a Swift Package.
3.1 Reset the Package Cache of your Application Target i.e YourApp.xcodeproj. [If you are installing AmityUIKit for the first time, you can skip this step]Select App Target In Xcode Project → Select File Menu for Xcode→ Packages → Reset Package Cache
3.2 Link SharedFrameworks & AmityUIKit.framework to YourApp.xcodeproj target as shown below.
4. On MyApp.xcodeproj, let’s try importing social.plus UIKit / social.plus SDK and call some APIs. You should be able to compile and run the app.
You can modify the iOS open-source UIKit to customize behaviors to fit your needs. To modify the code, simply copy and paste it into your local machine.We recommend that you first fork the repository before starting any customization work so that it will be easier to merge the code with the next version update that we provide from the main repository.References on forking: https://docs.github.com/en/get-started/quickstart/fork-a-repo
<key>NSCameraUsageDescription</key><string>Access camera to take photos and videos</string><key>NSPhotoLibraryUsageDescription</key><string>Access photo library to select images</string><key>NSMicrophoneUsageDescription</key><string>Access microphone for video recording</string>
Navigate to your current application in Android Studio
In the top navigation bar, go to File → New → Import Module…
Choose the source directory where you downloaded/cloned the UIKit source code
Select the modules to import
Step 3: Select Required Modules Import these essential modules:
:chat - Chat functionality
:common - Common utilities and components
:social - Social features
:amity-uikit - Main UIKit module
Optional: The :sample module contains examples of UIKit Fragments and Activities for reference but is not required for your implementation.
Step 4: Configure settings.gradle Navigate to your root project’s settings.gradle file and verify the module paths:
include ':amity-uikit'include ':chat'include ':common'include ':social'// Verify paths are correct (Android Studio may auto-generate these)project(':amity-uikit').projectDir = new File('../Amity-Social-Cloud-UIKit-Android-OpenSource/amity-uikit')project(':chat').projectDir = new File('../Amity-Social-Cloud-UIKit-Android-OpenSource/chat')project(':common').projectDir = new File('../Amity-Social-Cloud-UIKit-Android-OpenSource/common')project(':social').projectDir = new File('../Amity-Social-Cloud-UIKit-Android-OpenSource/social')
Step 5: Configure Repository in settings.gradle Add the JitPack repository to dependencyResolutionManagement:
Step 6: Add Dependencies to App Module In your app-level build.gradle, add the UIKit dependency:
dependencies { implementation project(path: ':amity-uikit') // Required dependencies will be included automatically // through the UIKit module's dependencies}
Step 7: Configure Packaging Options Add packaging exclusions in your app-level build.gradle:
Running Storybook for Component Development:Storybook allows you to view and develop UI components in isolation, which is helpful for customization and testing.Step 1: Clone Repository
# Sync your fork with upstreamgit remote add upstream https://github.com/AmityCo/Amity-Social-Cloud-UIKit-Web-OpenSource.gitgit fetch upstreamgit checkout maingit merge upstream/maingit push origin main# Rebuild after updatespnpm installpnpm run build
For Local Development:
cd Amity-Social-Cloud-UIKit-Web-OpenSourcegit pull origin mainpnpm installpnpm run build# Re-link to your project if neededcd YourProjectpnpm i file:<path-to-amity-ui-kit-repository>
Build Configuration: Control pubspec dependencies and build settings
React Native UIKit is only available through GitHub forking - no package installation option available.
Our UIKit includes user interfaces to enable fast integration of standard Social features into new or existing applications. The React Native UIKit supports integration with React Native CLI, providing you with a flexible experience to seamlessly integrate social features into your existing React Native application.
Important: If you’d like to use React Native Expo, please visit the Expo repository instead.
<key>NSCameraUsageDescription</key><string>App needs access to the camera to take photos</string><key>NSMicrophoneUsageDescription</key><string>App needs access to the microphone to record audio</string><key>NSPhotoLibraryUsageDescription</key><string>App needs access to the gallery to select photos</string>
If you’re upgrading to React Navigation v7, follow these steps:1. Upgrade Dependencies: Update these packages to match UIKit’s exact versions in package.json:
@react-navigation/native
@react-navigation/native-stack
@react-navigation/stack
react-native-screens
2. Replace independent={true} with NavigationIndependentTree:Before:
<NavigationContainer independent={true}> {/* Your navigators */}</NavigationContainer>
After:
import { NavigationIndependentTree } from '@react-navigation/native';<NavigationIndependentTree> <NavigationContainer> {/* Your navigators */} </NavigationContainer></NavigationIndependentTree>