> ## Documentation Index
> Fetch the complete documentation index at: https://learn.social.plus/llms.txt
> Use this file to discover all available pages before exploring further.
# Installation
> Install social.plus UIKit across all platforms with package managers or GitHub source code
Choose your platform and installation method to get started with social.plus UIKit. We support both **package installation** for quick setup and **GitHub forking** for complete customization.
**Two Installation Approaches**: Use package installation for quick
integration, or fork from GitHub for complete control and customization.
## Installation Methods
**Quick Setup (Recommended)**
* Managed dependencies
* Easy updates
* Minimal configuration
* Perfect for most use cases
**Complete Customization**
* Full source code access
* Custom modifications
* Advanced integrations
* Maximum flexibility
***
## Package Installation
Install UIKit through package managers for quick integration:
### Prerequisites
* iOS 15.0 or later
* Xcode 26.0 or later
* Swift 6.0 or later
### Installation Steps
**Add Package Dependency in Xcode:**
1. Open your project in Xcode
2. Go to **File → Add Package Dependencies**
3. Enter the repository URL:
```
https://github.com/AmityCo/Amity-Social-Cloud-UIKit-iOS-SwiftPM
```
4. Select dependency rule (Up to Next Major for stable releases)
\*\*Please specify the required version of the UIKit using `Exact Version` Dependency Rule as shown in the image below.
For Example: `Exact Version` `4.6.0`
5. Choose the latest version and add to your target
**Import in your code:**
```swift theme={null}
import AmityUIKit
```
### Initialize UIKit
```swift theme={null}
// In your AppDelegate or SceneDelegate
import AmityUIKit
AmityUIKitManager.setup(
apiKey: "YOUR_API_KEY",
endpoint: .US // .US, .EU, or .SG
)
// Register user and present social home
AmityUIKitManager.registerDevice(
withUserId: "user123",
displayName: "John Doe"
) { success, error in
if success {
AmityUIKitManager.presentSocialHome()
}
}
```
### Required Permissions (Info.plist)
```xml theme={null}
NSCameraUsageDescription
Access camera to take photos and videos
NSPhotoLibraryUsageDescription
Access photo library to select images
NSMicrophoneUsageDescription
Access microphone for video recording
```
### Prerequisites
* Android 5.0 (API Level 21) or higher
* Kotlin support enabled
* Data binding enabled
### Gradle Configuration
**Project-level build.gradle:**
```gradle theme={null}
allprojects {
repositories {
google()
mavenCentral()
maven { url 'https://jitpack.io' }
}
}
```
**App-level build.gradle:**
```gradle theme={null}
android {
compileSdk 34
defaultConfig {
minSdk 21
targetSdk 34
}
buildFeatures {
dataBinding = true
}
compileOptions {
sourceCompatibility JavaVersion.VERSION_1_8
targetCompatibility JavaVersion.VERSION_1_8
}
kotlinOptions {
jvmTarget = JavaVersion.VERSION_1_8
}
packagingOptions {
exclude 'META-INF/INDEX.LIST'
exclude 'META-INF/io.netty.versions.properties'
}
}
dependencies {
implementation 'com.github.AmityCo.Amity-Social-Cloud-UIKit-Android:amity-uikit:x.y.z'
}
```
### Initialize UIKit
```kotlin theme={null}
// In your Application class
class MyApplication : Application() {
override fun onCreate() {
super.onCreate()
AmityUIKit4Manager.setup(
apiKey = "YOUR_API_KEY",
endpoint = AmityEndpoint.EU
)
}
}
```
### Prerequisites
* React 18 or later (hooks support required)
* Node.js 16 or later
* TypeScript support (recommended)
* Modern browser with ES6+ support
### Installation
```bash theme={null}
pnpm i @amityco/ui-kit
```
### Setup AmityUIKitProvider
```typescript theme={null}
import React from 'react';
import { AmityUIKitProvider } from '@amityco/ui-kit-react';
import '@amityco/ui-kit-react/dist/index.css';
function App() {
return (
);
}
export default App;
```
***
## GitHub Fork Installation
For complete customization and control over the UIKit source code:
**Note**: React Native and Flutter UIKit is only available through GitHub
forking, not package installation.
### Fork Repository
1. Fork the [iOS UIKit repository](https://github.com/AmityCo/ASC-UIKit-iOS-OpenSource)
2. Clone your forked repository:
```bash theme={null}
git clone https://github.com/YOUR_USERNAME/ASC-UIKit-iOS-OpenSource.git
```
### Open-source Installation
With open-source, developers have more flexibility and greater customization options, allowing you to have complete control over the visual style. Open sourcing allows for more transparency and visibility and enables contributions from a greater developer community in terms of good design, implementation, code improvement, and fixes, translating into a better product and typical development.
### Migration from Existing Project
#### Remove Existing Dependencies (If Applicable)
If you've never used UI Kit, you may skip this step and proceed to the next step. If you're integrating the UI Kit with an existing project, you'll need to remove and unlink the managed UIKit from your project before proceeding with the integration.
### Migrate to iOS UIKit Open Source
There are several ways for you to migrate the open-source iOS UIKit into your projects, depending on your workflow. One way that we recommend is via Git Submodule. This instruction assumes that the app project is already set up with a Git repository.
**1. Add the git submodule of social.plus UIKit open source into your git repository:**
```bash theme={null}
git submodule add https://github.com/AmityCo/ASC-UIKit-iOS-OpenSource
```
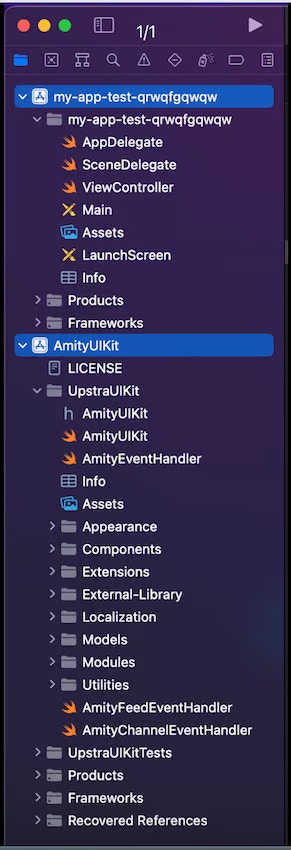
**2. Create an Xcode Workspace, and then add both MyApp.xcodeproj and AmityUIKit.xcodeproj together under the same workspace.**
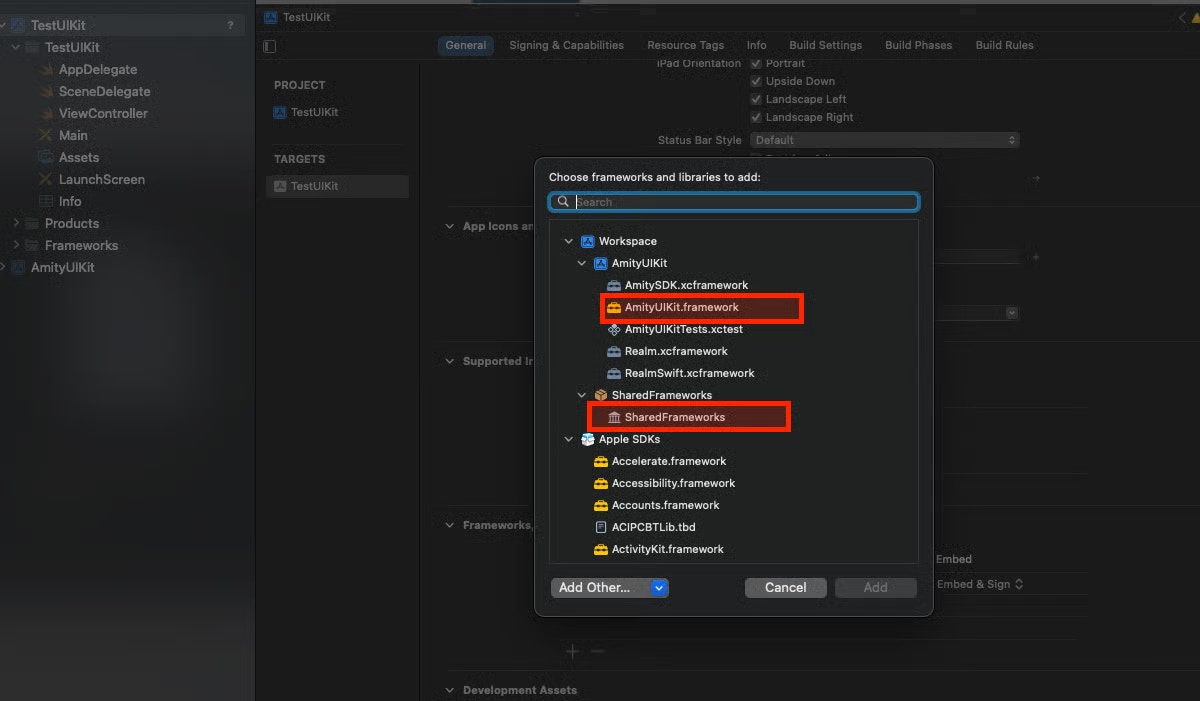
 **3. AmityUIKit links with other dependencies such as AmitySDK through SharedFrameworks which is a Swift Package.**
* **3.1 Reset the Package Cache of your Application Target i.e YourApp.xcodeproj. \[If you are installing AmityUIKit for the first time, you can skip this step]**
Select App Target In Xcode Project → Select File Menu for Xcode→ Packages → Reset Package Cache
* **3.2 Link SharedFrameworks & AmityUIKit.framework to YourApp.xcodeproj target as shown below.**
**3. AmityUIKit links with other dependencies such as AmitySDK through SharedFrameworks which is a Swift Package.**
* **3.1 Reset the Package Cache of your Application Target i.e YourApp.xcodeproj. \[If you are installing AmityUIKit for the first time, you can skip this step]**
Select App Target In Xcode Project → Select File Menu for Xcode→ Packages → Reset Package Cache
* **3.2 Link SharedFrameworks & AmityUIKit.framework to YourApp.xcodeproj target as shown below.**
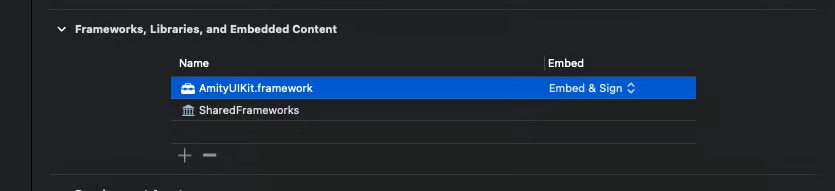
 **4. On MyApp.xcodeproj, let's try importing social.plus UIKit / social.plus SDK and call some APIs. You should be able to compile and run the app.**
 ### Modify iOS Open Source UIKit
You can modify the iOS open-source UIKit to customize behaviors to fit your needs. To modify the code, simply copy and paste it into your local machine.
We recommend that you first fork the repository before starting any customization work so that it will be easier to merge the code with the next version update that we provide from the main repository.
References on forking: [https://docs.github.com/en/get-started/quickstart/fork-a-repo](https://docs.github.com/en/get-started/quickstart/fork-a-repo)
### Get Latest iOS Open Source UIKit Updates
To update to the latest version of the UIKit, you can pull the latest commit of the git submodule.
```bash theme={null}
cd https://github.com/AmityCo/ASC-UIKit-iOS-OpenSource
git pull origin master
git checkout tags/4.0.0-beta01
cd ..
git add .
git commit -m "Update ios uikit opensource submodule"
git push origin master
```
### Required Setup
**Info.plist Permissions:**
```xml theme={null}
NSCameraUsageDescription
Access camera to take photos and videos
NSPhotoLibraryUsageDescription
Access photo library to select images
NSMicrophoneUsageDescription
Access microphone for video recording
```
**Initialize in AppDelegate:**
```swift theme={null}
import AmityUIKit
func application(_ application: UIApplication, didFinishLaunchingWithOptions launchOptions: [UIApplication.LaunchOptionsKey: Any]?) -> Bool {
AmityUIKitManager.setup(
apiKey: "YOUR_API_KEY",
endpoint: .US // .US, .EU, or .SG
)
return true
}
```
### Customization Benefits
* **Complete UI Control**: Modify view controllers, storyboards, XIB files, and Swift UI components
* **Custom Theming**: Change colors, fonts, images, and styling throughout the app
* **Business Logic**: Add custom validation, analytics, user flows, and integrations
* **Advanced Features**: Implement custom post types, moderation rules, and push notifications
* **Native Performance**: Direct access to native iOS optimizations and latest features
* **Version Control**: Track changes and manage updates through your own repository
### Fork Repository
1. Fork the [Android UIKit repository](https://github.com/AmityCo/Amity-Social-Cloud-UIKit-Android-OpenSource)
2. Clone your forked repository:
```bash theme={null}
git clone https://github.com/YOUR_USERNAME/Amity-Social-Cloud-UIKit-Android-OpenSource.git
```
### Integration Methods
**Step 1: Download/Clone Source Code**
* Clone or download the source code from the [open-source GitHub repository](https://github.com/AmityCo/Amity-Social-Cloud-UIKit-Android-OpenSource)
* Extract the downloaded ZIP file if applicable
**Step 2: Import Module in Android Studio**
1. Navigate to your current application in Android Studio
2. In the top navigation bar, go to **File → New → Import Module...**
3. Choose the source directory where you downloaded/cloned the UIKit source code
4. Select the modules to import
**Step 3: Select Required Modules** Import these essential modules:
* `:chat` - Chat functionality
* `:common` - Common utilities and components
* `:social` - Social features
* `:amity-uikit` - Main UIKit module
**Optional**: The `:sample` module contains examples of UIKit Fragments and Activities for reference but is not required for your implementation.
**Step 4: Configure settings.gradle** Navigate to your root project's `settings.gradle` file and verify the module paths:
```gradle theme={null}
include ':amity-uikit'
include ':chat'
include ':common'
include ':social'
// Verify paths are correct (Android Studio may auto-generate these)
project(':amity-uikit').projectDir = new File('../Amity-Social-Cloud-UIKit-Android-OpenSource/amity-uikit')
project(':chat').projectDir = new File('../Amity-Social-Cloud-UIKit-Android-OpenSource/chat')
project(':common').projectDir = new File('../Amity-Social-Cloud-UIKit-Android-OpenSource/common')
project(':social').projectDir = new File('../Amity-Social-Cloud-UIKit-Android-OpenSource/social')
```
**Step 5: Configure Repository in settings.gradle** Add the JitPack repository to `dependencyResolutionManagement`:
```gradle theme={null}
dependencyResolutionManagement {
repositoriesMode.set(RepositoriesMode.FAIL_ON_PROJECT_REPOS)
repositories {
google()
mavenCentral()
maven { url 'https://jitpack.io' }
maven { url 'https://sdk.amity.co/artifactory/amity-release' }
}
}
```
**Step 6: Add Dependencies to App Module** In your app-level `build.gradle`, add the UIKit dependency:
```gradle theme={null}
dependencies {
implementation project(path: ':amity-uikit')
// Required dependencies will be included automatically
// through the UIKit module's dependencies
}
```
**Step 7: Configure Packaging Options** Add packaging exclusions in your app-level `build.gradle`:
```gradle theme={null}
android {
// ... other configurations
packagingOptions {
exclude 'META-INF/INDEX.LIST'
exclude 'META-INF/io.netty.versions.properties'
}
}
```
**Step 8: Apply Dependencies Configuration** In your project-level `build.gradle`, apply the dependencies configuration:
```gradle theme={null}
apply from: "../Amity-Social-Cloud-UIKit-Android-OpenSource/buildsystem/dependencies.gradle"
```
**Step 9: Configure gradle.properties** Ensure this setting is in your `gradle.properties` file:
```properties theme={null}
android.nonTransitiveRClass=false
```
### Required Configuration
**Project-level build.gradle:**
```gradle theme={null}
allprojects {
repositories {
google()
mavenCentral()
maven { url 'https://jitpack.io' }
maven { url 'https://sdk.amity.co/artifactory/amity-release' }
}
}
```
**App-level build.gradle configuration:**
```gradle theme={null}
android {
compileSdk 34
defaultConfig {
minSdk 21
targetSdk 34
multiDexEnabled true
}
buildFeatures {
dataBinding = true
viewBinding = true
}
compileOptions {
sourceCompatibility JavaVersion.VERSION_1_8
targetCompatibility JavaVersion.VERSION_1_8
}
kotlinOptions {
jvmTarget = JavaVersion.VERSION_1_8
}
packagingOptions {
exclude 'META-INF/INDEX.LIST'
exclude 'META-INF/io.netty.versions.properties'
}
}
```
**Initialize in Application class:**
```kotlin theme={null}
class MyApplication : Application() {
override fun onCreate() {
super.onCreate()
AmityUIKit4Manager.setup(
apiKey = "YOUR_API_KEY",
endpoint = AmityEndpoint.EU
)
}
}
```
### Permissions (AndroidManifest.xml)
```xml theme={null}
```
### Troubleshooting
**Common Issues:**
1. **Module paths not found**: Double-check the paths in `settings.gradle` match your actual directory structure
2. **Build errors**: Ensure all required modules (`:chat`, `:common`, `:social`, `:amity-uikit`) are imported
3. **Dependency conflicts**: Make sure `android.nonTransitiveRClass=false` is set in `gradle.properties`
4. **Repository access**: Verify JitPack and Amity repositories are correctly configured
**Clean and Rebuild:**
```bash theme={null}
./gradlew clean
./gradlew build
```
### Customization Benefits
* **Complete Layout Control**: Modify XML layouts, fragments, activities, and view components
* **Custom Styling**: Change themes, colors, typography, and dimensions using Android resources
* **Data Binding**: Implement custom data binding adapters, view models, and observers
* **Navigation Control**: Customize fragment transactions, navigation flows, and deep linking
* **Build Configurations**: Control ProGuard rules, build variants, flavors, and dependencies
* **Resource Management**: Override drawables, strings, colors, and other resources
* **Architecture Integration**: Integrate with MVVM, MVP, or other architectural patterns
### Fork Repository
1. Fork the [Web UIKit repository](https://github.com/AmityCo/Amity-Social-Cloud-UIKit-Web-OpenSource)
2. Clone your forked repository:
```bash theme={null}
git clone https://github.com/YOUR_USERNAME/Amity-Social-Cloud-UIKit-Web-OpenSource.git
```
### Prerequisites
**Install PNPM (Optional but Recommended):**
```bash theme={null}
corepack enable pnpm
```
[*Reference: PNPM Installation Guide*](https://pnpm.io/installation#using-corepack)
### Setup Methods
**Running Storybook for Component Development:**
Storybook allows you to view and develop UI components in isolation, which is helpful for customization and testing.
**Step 1: Clone Repository**
```bash theme={null}
git clone https://github.com/AmityCo/Amity-Social-Cloud-UIKit-Web-OpenSource.git
cd Amity-Social-Cloud-UIKit-Web-OpenSource
```
**Step 2: Install Dependencies**
```bash theme={null}
pnpm install
```
**Step 3: Configure Environment** Create a `.env` file at the root of the project:
```bash theme={null}
STORYBOOK_API_REGION=
STORYBOOK_API_KEY=
```
Replace `` (us/eu/sg) and `` with your actual credentials.
**Step 4: Run Storybook**
```bash theme={null}
pnpm run storybook
```
**Step 5: View Components** Open your browser and navigate to `http://localhost:6006` to view the Storybook interface.
**Installing UIKit with Your Application:**
**Step 1: Clone Repository**
```bash theme={null}
git clone https://github.com/AmityCo/Amity-Social-Cloud-UIKit-Web-OpenSource.git
cd Amity-Social-Cloud-UIKit-Web-OpenSource
```
**Step 2: Install Dependencies**
```bash theme={null}
pnpm install
```
**Step 3: Build the Project**
```bash theme={null}
pnpm run build
```
**Step 4: Navigate to Your Application**
```bash theme={null}
cd
```
**Step 5: Link UIKit to Your Application** Choose your preferred package manager:
**NPM:**
```bash theme={null}
npm link file: --save
```
**Yarn (Classic):**
```bash theme={null}
yarn add file:
```
**PNPM:**
```bash theme={null}
pnpm i file:
```
**Alternative: Git Dependency** Add to your `package.json`:
```json theme={null}
{
"dependencies": {
"@amityco/ui-kit-react": "git+https://github.com/YOUR_USERNAME/Amity-Social-Cloud-UIKit-Web-OpenSource.git#main"
}
}
```
**Copy Source Files Method:**
For maximum customization, copy the source files directly into your project:
**Step 1: Copy Source Files**
```bash theme={null}
# Copy the src folder to your project
cp -r Amity-Social-Cloud-UIKit-Web-OpenSource/src YourProject/src/amity-uikit
```
**Step 2: Install Peer Dependencies**
```bash theme={null}
npm install react react-dom typescript
npm install @types/react @types/react-dom
```
**Step 3: Configure Build Tools** Update your TypeScript, Webpack, or Vite configuration to handle the new source files.
**Step 4: Import Components**
```jsx theme={null}
import { AmityUIKitProvider } from './amity-uikit/components';
```
### Required Dependencies
Ensure these peer dependencies are installed in your project:
```json theme={null}
{
"peerDependencies": {
"react": ">=16.8.0",
"react-dom": ">=16.8.0"
},
"devDependencies": {
"@types/react": "^18.0.0",
"@types/react-dom": "^18.0.0",
"typescript": "^4.9.0"
}
}
```
### Updating to Latest Version
**For Forked Repository:**
```bash theme={null}
# Sync your fork with upstream
git remote add upstream https://github.com/AmityCo/Amity-Social-Cloud-UIKit-Web-OpenSource.git
git fetch upstream
git checkout main
git merge upstream/main
git push origin main
# Rebuild after updates
pnpm install
pnpm run build
```
**For Local Development:**
```bash theme={null}
cd Amity-Social-Cloud-UIKit-Web-OpenSource
git pull origin main
pnpm install
pnpm run build
# Re-link to your project if needed
cd YourProject
pnpm i file:
```
### Troubleshooting
**Common Issues:**
1. **Build errors**: Ensure all peer dependencies are correctly installed
2. **Module resolution**: Check your bundler configuration and alias settings
3. **TypeScript errors**: Verify TypeScript configuration includes UIKit source paths
4. **Style conflicts**: Import UIKit styles after your application styles
**Reset and Clean Installation:**
```bash theme={null}
# In UIKit directory
rm -rf node_modules package-lock.json
pnpm install
pnpm run build
# In your project
rm -rf node_modules package-lock.json
npm install
```
### Customization Benefits
* **Complete Component Control**: Edit React components, hooks, and utilities directly
* **Advanced Styling**: Customize CSS-in-JS, SCSS, CSS modules, and theme configurations
* **State Management**: Implement custom Redux, Zustand, or Context patterns
* **Routing Integration**: Customize React Router or Next.js routing flows
* **Bundle Optimization**: Control webpack/Vite configuration, code splitting, and tree shaking
* **Development Experience**: Use Storybook for isolated component development and testing
* **API Integration**: Modify API calls, data fetching, and caching strategies
### Fork Repository
1. Fork the [Flutter UIKit repository](https://github.com/AmityCo/Amity-Social-UIKit-Flutter-Opensource)
2. Clone your forked repository:
```bash theme={null}
git clone https://github.com/AmityCo/Amity-Social-UIKit-Flutter-Opensource.git
```
### Integration Methods
**Add to pubspec.yaml:**
```yaml theme={null}
dependencies:
amity_uikit_beta_service:
path: ./Amity-Social-UIKit-Flutter-Opensource
```
**Project structure:**
```
YourFlutterProject/
├── lib/
├── pubspec.yaml
└── Amity-Social-UIKit-Flutter-Opensource/
├── lib/
└── pubspec.yaml
```
**Add to pubspec.yaml:**
```yaml theme={null}
dependencies:
amity_uikit_beta_service:
git:
url: https://github.com/YOUR_USERNAME/Amity-Social-UIKit-Flutter-Opensource.git
ref: main # or specific branch/tag
```
**Add as submodule:**
```bash theme={null}
cd YourFlutterProject
git submodule add https://github.com/YOUR_USERNAME/Amity-Social-UIKit-Flutter-Opensource.git packages/amity_uikit
git submodule update --init --recursive
```
**Update pubspec.yaml:**
```yaml theme={null}
dependencies:
amity_uikit_beta_service:
path: packages/amity_uikit
```
### Initialization
```dart theme={null}
import 'package:flutter/material.dart';
import 'package:amity_uikit_beta_service/amity_uikit.dart';
import 'package:amity_uikit_beta_service/v4/utils/config_provider_widget.dart';
void main() async {
WidgetsFlutterBinding.ensureInitialized();
// Initialize UIKit
await AmityUIKit().setup(
apikey: 'YOUR_API_KEY',
region: AmityEndpointRegion.eu,
);
runApp(MyApp());
}
class MyApp extends StatelessWidget {
@override
Widget build(BuildContext context) {
return AmityUIKitProvider(
child: SocialHomePageConfigProviderWidget(),
);
}
}
```
### Customization Benefits
* **Widget Modification**: Edit Flutter widgets, screens, and navigation flows
* **Theme Customization**: Modify Material/Cupertino themes and custom styling
* **State Management**: Implement custom Provider, Bloc, or Riverpod patterns
* **Platform Channels**: Add custom platform-specific functionality
* **Build Configuration**: Control pubspec dependencies and build settings
**React Native UIKit is only available through GitHub forking** - no package installation option available.
Our UIKit includes user interfaces to enable fast integration of standard Social features into new or existing applications. The React Native UIKit supports integration with **React Native CLI**, providing you with a flexible experience to seamlessly integrate social features into your existing React Native application.
**Important**: If you'd like to use React Native Expo, please visit the [Expo repository](https://github.com/AmityCo/Amity-Social-UIKit-React-Native-OpenSource) instead.
### Minimum Requirements
* Node.js 16 or later
* JDK 17.0.10
* Ruby 3.2.0
* Xcode 15
* React Native CLI (not Expo)
### Fork Repository
1. Fork the [React Native UIKit repository](https://github.com/AmityCo/Amity-Social-UIKit-React-Native-CLI-OpenSource)
2. Clone your forked repository:
```bash theme={null}
git clone https://github.com/YOUR_USERNAME/Amity-Social-UIKit-React-Native-CLI-OpenSource.git
```
### Installation Steps
**Step 1: Build UIKit Package**
```bash theme={null}
cd Amity-Social-UIKit-React-Native-CLI-OpenSource
yarn install # or npm install
npm pack
```
This will generate `amityco-asc-react-native-ui-kit-x.x.x.tgz` file.
**Step 2: Install in Your Project**
```bash theme={null}
# Copy the .tgz file to your project folder
# Then install the UIKit and peer dependencies
yarn add ./amityco-asc-react-native-ui-kit-x.x.x.tgz
# Install required peer dependencies
yarn add react-native-safe-area-context react-native-image-picker @react-native-async-storage/async-storage react-native-svg react-native-gesture-handler react-native-screens react-native-video@6.0.0-beta.6 react-native-create-thumbnail @react-native-community/netinfo @react-navigation/native @react-navigation/native-stack @react-navigation/stack react-native-vision-camera react-native-push-notification @api.video/react-native-livestream@2.0.0 react-native-get-random-values react-native-rsa-native react-native-vlc-media-player react-native-fs@2.20.0 @react-native-community/datetimepicker@7.1.0
```
### Platform Configuration
**iOS Configuration (ios/Podfile):**
```ruby theme={null}
platform :ios, '12.0' # Minimum iOS 12.0
target 'YourApp' do
config = use_native_modules!
# Required for UIKit functionality
pod 'SPTPersistentCache', :modular_headers => true
pod 'DVAssetLoaderDelegate', :modular_headers => true
$RNVideoUseVideoCaching = true
# Your other dependencies...
end
```
**iOS Deployment Target:**
* In Xcode, set **Minimum Deployments** to at least **iOS 12.0**
**Install iOS dependencies:**
```bash theme={null}
npx pod-install
```
**Android Configuration (android/build.gradle):**
```gradle theme={null}
buildscript {
ext {
kotlinVersion = "1.7.0" // 1.7.0 or above
compileSdkVersion = 34
buildToolsVersion = "34.0.0"
// ... other configurations
}
}
```
### Required Permissions
**iOS Permissions (ios/YourApp/Info.plist):**
```xml theme={null}
NSCameraUsageDescription
App needs access to the camera to take photos
NSMicrophoneUsageDescription
App needs access to the microphone to record audio
NSPhotoLibraryUsageDescription
App needs access to the gallery to select photos
```
**Android Permissions (android/app/src/main/AndroidManifest.xml):**
```xml theme={null}
```
### Basic Usage
**Simple Integration:**
```jsx theme={null}
import React from 'react';
import {
AmityUiKitSocial,
AmityUiKitProvider,
} from 'amity-react-native-social-ui-kit';
export default function App() {
return (
);
}
```
### Individual Screen Components
UIKit supports importing and rendering individual screens for more granular control:
**Available Screens:**
* `CommunityHome`
* `PostDetail`
* `AmityExploreComponent`
**Usage with Individual Screens:**
```jsx theme={null}
import React from 'react';
import {
AmityUiKitProvider,
AmityPageRenderer, // Required for individual screens
CommunityHome,
PostDetail,
} from 'amity-react-native-social-ui-kit';
export default function App() {
return (
);
}
```
**Note**: `AmityPageRenderer` is only required when using individual screen components. It's not needed for the `AmityUiKitSocial` component.
### React Navigation v7 Migration
If you're upgrading to React Navigation v7, follow these steps:
**1. Upgrade Dependencies:** Update these packages to match UIKit's exact versions in `package.json`:
* `@react-navigation/native`
* `@react-navigation/native-stack`
* `@react-navigation/stack`
* `react-native-screens`
**`2. Replace independent={true} with NavigationIndependentTree:`**
**Before:**
```jsx theme={null}
{/* Your navigators */}
```
**After:**
```jsx theme={null}
import { NavigationIndependentTree } from '@react-navigation/native';
{/* Your navigators */}
```
### Try Sample App
The repository includes a built-in sample app for testing:
**1. Setup Sample App:**
```bash theme={null}
cd example
yarn install
```
**2. Configure Firebase (for push notifications):**
* Set up Firebase project at [https://console.firebase.google.com/](https://console.firebase.google.com/)
* Download `google-services.json` and `GoogleService-Info.plist`
* Copy to `/example/android/app/` and `/example/ios/` respectively
**3. Configure App Settings:** Edit `/example/src/App.tsx` with your credentials:
* `apiKey`
* `apiRegion`
* `apiEndpoint`
* `userId`
* `displayName`
* `fcmToken`
**4. Run Sample App:**
```bash theme={null}
# From root directory
yarn install
# Run iOS
yarn example ios
# Run Android
yarn example android
```
### Customization Benefits
* **Complete Component Control**: Modify React Native components, screens, and navigation flows
* **Advanced Styling**: Override StyleSheet styles and implement custom theme configurations
* **Individual Screen Usage**: Import and use specific screens for granular control
* **Native Module Integration**: Add custom native modules and third-party libraries
* **Navigation Flexibility**: Customize React Navigation flows and screen transitions
* **State Management**: Implement custom Redux/Context state management patterns
* **Push Notifications**: Full control over Firebase configuration and notification handling
***
## Next Steps
After installation, continue with:
Configure user authentication and API credentials
Add your first UIKit component to your app
Customize themes, colors, and styling
**Installation Complete?** Head to [Authentication
Setup](/uikit/getting-started/authentication) to configure your API
credentials and start building!
### Modify iOS Open Source UIKit
You can modify the iOS open-source UIKit to customize behaviors to fit your needs. To modify the code, simply copy and paste it into your local machine.
We recommend that you first fork the repository before starting any customization work so that it will be easier to merge the code with the next version update that we provide from the main repository.
References on forking: [https://docs.github.com/en/get-started/quickstart/fork-a-repo](https://docs.github.com/en/get-started/quickstart/fork-a-repo)
### Get Latest iOS Open Source UIKit Updates
To update to the latest version of the UIKit, you can pull the latest commit of the git submodule.
```bash theme={null}
cd https://github.com/AmityCo/ASC-UIKit-iOS-OpenSource
git pull origin master
git checkout tags/4.0.0-beta01
cd ..
git add .
git commit -m "Update ios uikit opensource submodule"
git push origin master
```
### Required Setup
**Info.plist Permissions:**
```xml theme={null}
NSCameraUsageDescription
Access camera to take photos and videos
NSPhotoLibraryUsageDescription
Access photo library to select images
NSMicrophoneUsageDescription
Access microphone for video recording
```
**Initialize in AppDelegate:**
```swift theme={null}
import AmityUIKit
func application(_ application: UIApplication, didFinishLaunchingWithOptions launchOptions: [UIApplication.LaunchOptionsKey: Any]?) -> Bool {
AmityUIKitManager.setup(
apiKey: "YOUR_API_KEY",
endpoint: .US // .US, .EU, or .SG
)
return true
}
```
### Customization Benefits
* **Complete UI Control**: Modify view controllers, storyboards, XIB files, and Swift UI components
* **Custom Theming**: Change colors, fonts, images, and styling throughout the app
* **Business Logic**: Add custom validation, analytics, user flows, and integrations
* **Advanced Features**: Implement custom post types, moderation rules, and push notifications
* **Native Performance**: Direct access to native iOS optimizations and latest features
* **Version Control**: Track changes and manage updates through your own repository
### Fork Repository
1. Fork the [Android UIKit repository](https://github.com/AmityCo/Amity-Social-Cloud-UIKit-Android-OpenSource)
2. Clone your forked repository:
```bash theme={null}
git clone https://github.com/YOUR_USERNAME/Amity-Social-Cloud-UIKit-Android-OpenSource.git
```
### Integration Methods
**Step 1: Download/Clone Source Code**
* Clone or download the source code from the [open-source GitHub repository](https://github.com/AmityCo/Amity-Social-Cloud-UIKit-Android-OpenSource)
* Extract the downloaded ZIP file if applicable
**Step 2: Import Module in Android Studio**
1. Navigate to your current application in Android Studio
2. In the top navigation bar, go to **File → New → Import Module...**
3. Choose the source directory where you downloaded/cloned the UIKit source code
4. Select the modules to import
**Step 3: Select Required Modules** Import these essential modules:
* `:chat` - Chat functionality
* `:common` - Common utilities and components
* `:social` - Social features
* `:amity-uikit` - Main UIKit module
**Optional**: The `:sample` module contains examples of UIKit Fragments and Activities for reference but is not required for your implementation.
**Step 4: Configure settings.gradle** Navigate to your root project's `settings.gradle` file and verify the module paths:
```gradle theme={null}
include ':amity-uikit'
include ':chat'
include ':common'
include ':social'
// Verify paths are correct (Android Studio may auto-generate these)
project(':amity-uikit').projectDir = new File('../Amity-Social-Cloud-UIKit-Android-OpenSource/amity-uikit')
project(':chat').projectDir = new File('../Amity-Social-Cloud-UIKit-Android-OpenSource/chat')
project(':common').projectDir = new File('../Amity-Social-Cloud-UIKit-Android-OpenSource/common')
project(':social').projectDir = new File('../Amity-Social-Cloud-UIKit-Android-OpenSource/social')
```
**Step 5: Configure Repository in settings.gradle** Add the JitPack repository to `dependencyResolutionManagement`:
```gradle theme={null}
dependencyResolutionManagement {
repositoriesMode.set(RepositoriesMode.FAIL_ON_PROJECT_REPOS)
repositories {
google()
mavenCentral()
maven { url 'https://jitpack.io' }
maven { url 'https://sdk.amity.co/artifactory/amity-release' }
}
}
```
**Step 6: Add Dependencies to App Module** In your app-level `build.gradle`, add the UIKit dependency:
```gradle theme={null}
dependencies {
implementation project(path: ':amity-uikit')
// Required dependencies will be included automatically
// through the UIKit module's dependencies
}
```
**Step 7: Configure Packaging Options** Add packaging exclusions in your app-level `build.gradle`:
```gradle theme={null}
android {
// ... other configurations
packagingOptions {
exclude 'META-INF/INDEX.LIST'
exclude 'META-INF/io.netty.versions.properties'
}
}
```
**Step 8: Apply Dependencies Configuration** In your project-level `build.gradle`, apply the dependencies configuration:
```gradle theme={null}
apply from: "../Amity-Social-Cloud-UIKit-Android-OpenSource/buildsystem/dependencies.gradle"
```
**Step 9: Configure gradle.properties** Ensure this setting is in your `gradle.properties` file:
```properties theme={null}
android.nonTransitiveRClass=false
```
### Required Configuration
**Project-level build.gradle:**
```gradle theme={null}
allprojects {
repositories {
google()
mavenCentral()
maven { url 'https://jitpack.io' }
maven { url 'https://sdk.amity.co/artifactory/amity-release' }
}
}
```
**App-level build.gradle configuration:**
```gradle theme={null}
android {
compileSdk 34
defaultConfig {
minSdk 21
targetSdk 34
multiDexEnabled true
}
buildFeatures {
dataBinding = true
viewBinding = true
}
compileOptions {
sourceCompatibility JavaVersion.VERSION_1_8
targetCompatibility JavaVersion.VERSION_1_8
}
kotlinOptions {
jvmTarget = JavaVersion.VERSION_1_8
}
packagingOptions {
exclude 'META-INF/INDEX.LIST'
exclude 'META-INF/io.netty.versions.properties'
}
}
```
**Initialize in Application class:**
```kotlin theme={null}
class MyApplication : Application() {
override fun onCreate() {
super.onCreate()
AmityUIKit4Manager.setup(
apiKey = "YOUR_API_KEY",
endpoint = AmityEndpoint.EU
)
}
}
```
### Permissions (AndroidManifest.xml)
```xml theme={null}
```
### Troubleshooting
**Common Issues:**
1. **Module paths not found**: Double-check the paths in `settings.gradle` match your actual directory structure
2. **Build errors**: Ensure all required modules (`:chat`, `:common`, `:social`, `:amity-uikit`) are imported
3. **Dependency conflicts**: Make sure `android.nonTransitiveRClass=false` is set in `gradle.properties`
4. **Repository access**: Verify JitPack and Amity repositories are correctly configured
**Clean and Rebuild:**
```bash theme={null}
./gradlew clean
./gradlew build
```
### Customization Benefits
* **Complete Layout Control**: Modify XML layouts, fragments, activities, and view components
* **Custom Styling**: Change themes, colors, typography, and dimensions using Android resources
* **Data Binding**: Implement custom data binding adapters, view models, and observers
* **Navigation Control**: Customize fragment transactions, navigation flows, and deep linking
* **Build Configurations**: Control ProGuard rules, build variants, flavors, and dependencies
* **Resource Management**: Override drawables, strings, colors, and other resources
* **Architecture Integration**: Integrate with MVVM, MVP, or other architectural patterns
### Fork Repository
1. Fork the [Web UIKit repository](https://github.com/AmityCo/Amity-Social-Cloud-UIKit-Web-OpenSource)
2. Clone your forked repository:
```bash theme={null}
git clone https://github.com/YOUR_USERNAME/Amity-Social-Cloud-UIKit-Web-OpenSource.git
```
### Prerequisites
**Install PNPM (Optional but Recommended):**
```bash theme={null}
corepack enable pnpm
```
[*Reference: PNPM Installation Guide*](https://pnpm.io/installation#using-corepack)
### Setup Methods
**Running Storybook for Component Development:**
Storybook allows you to view and develop UI components in isolation, which is helpful for customization and testing.
**Step 1: Clone Repository**
```bash theme={null}
git clone https://github.com/AmityCo/Amity-Social-Cloud-UIKit-Web-OpenSource.git
cd Amity-Social-Cloud-UIKit-Web-OpenSource
```
**Step 2: Install Dependencies**
```bash theme={null}
pnpm install
```
**Step 3: Configure Environment** Create a `.env` file at the root of the project:
```bash theme={null}
STORYBOOK_API_REGION=
STORYBOOK_API_KEY=
```
Replace `` (us/eu/sg) and `` with your actual credentials.
**Step 4: Run Storybook**
```bash theme={null}
pnpm run storybook
```
**Step 5: View Components** Open your browser and navigate to `http://localhost:6006` to view the Storybook interface.
**Installing UIKit with Your Application:**
**Step 1: Clone Repository**
```bash theme={null}
git clone https://github.com/AmityCo/Amity-Social-Cloud-UIKit-Web-OpenSource.git
cd Amity-Social-Cloud-UIKit-Web-OpenSource
```
**Step 2: Install Dependencies**
```bash theme={null}
pnpm install
```
**Step 3: Build the Project**
```bash theme={null}
pnpm run build
```
**Step 4: Navigate to Your Application**
```bash theme={null}
cd
```
**Step 5: Link UIKit to Your Application** Choose your preferred package manager:
**NPM:**
```bash theme={null}
npm link file: --save
```
**Yarn (Classic):**
```bash theme={null}
yarn add file:
```
**PNPM:**
```bash theme={null}
pnpm i file:
```
**Alternative: Git Dependency** Add to your `package.json`:
```json theme={null}
{
"dependencies": {
"@amityco/ui-kit-react": "git+https://github.com/YOUR_USERNAME/Amity-Social-Cloud-UIKit-Web-OpenSource.git#main"
}
}
```
**Copy Source Files Method:**
For maximum customization, copy the source files directly into your project:
**Step 1: Copy Source Files**
```bash theme={null}
# Copy the src folder to your project
cp -r Amity-Social-Cloud-UIKit-Web-OpenSource/src YourProject/src/amity-uikit
```
**Step 2: Install Peer Dependencies**
```bash theme={null}
npm install react react-dom typescript
npm install @types/react @types/react-dom
```
**Step 3: Configure Build Tools** Update your TypeScript, Webpack, or Vite configuration to handle the new source files.
**Step 4: Import Components**
```jsx theme={null}
import { AmityUIKitProvider } from './amity-uikit/components';
```
### Required Dependencies
Ensure these peer dependencies are installed in your project:
```json theme={null}
{
"peerDependencies": {
"react": ">=16.8.0",
"react-dom": ">=16.8.0"
},
"devDependencies": {
"@types/react": "^18.0.0",
"@types/react-dom": "^18.0.0",
"typescript": "^4.9.0"
}
}
```
### Updating to Latest Version
**For Forked Repository:**
```bash theme={null}
# Sync your fork with upstream
git remote add upstream https://github.com/AmityCo/Amity-Social-Cloud-UIKit-Web-OpenSource.git
git fetch upstream
git checkout main
git merge upstream/main
git push origin main
# Rebuild after updates
pnpm install
pnpm run build
```
**For Local Development:**
```bash theme={null}
cd Amity-Social-Cloud-UIKit-Web-OpenSource
git pull origin main
pnpm install
pnpm run build
# Re-link to your project if needed
cd YourProject
pnpm i file:
```
### Troubleshooting
**Common Issues:**
1. **Build errors**: Ensure all peer dependencies are correctly installed
2. **Module resolution**: Check your bundler configuration and alias settings
3. **TypeScript errors**: Verify TypeScript configuration includes UIKit source paths
4. **Style conflicts**: Import UIKit styles after your application styles
**Reset and Clean Installation:**
```bash theme={null}
# In UIKit directory
rm -rf node_modules package-lock.json
pnpm install
pnpm run build
# In your project
rm -rf node_modules package-lock.json
npm install
```
### Customization Benefits
* **Complete Component Control**: Edit React components, hooks, and utilities directly
* **Advanced Styling**: Customize CSS-in-JS, SCSS, CSS modules, and theme configurations
* **State Management**: Implement custom Redux, Zustand, or Context patterns
* **Routing Integration**: Customize React Router or Next.js routing flows
* **Bundle Optimization**: Control webpack/Vite configuration, code splitting, and tree shaking
* **Development Experience**: Use Storybook for isolated component development and testing
* **API Integration**: Modify API calls, data fetching, and caching strategies
### Fork Repository
1. Fork the [Flutter UIKit repository](https://github.com/AmityCo/Amity-Social-UIKit-Flutter-Opensource)
2. Clone your forked repository:
```bash theme={null}
git clone https://github.com/AmityCo/Amity-Social-UIKit-Flutter-Opensource.git
```
### Integration Methods
**Add to pubspec.yaml:**
```yaml theme={null}
dependencies:
amity_uikit_beta_service:
path: ./Amity-Social-UIKit-Flutter-Opensource
```
**Project structure:**
```
YourFlutterProject/
├── lib/
├── pubspec.yaml
└── Amity-Social-UIKit-Flutter-Opensource/
├── lib/
└── pubspec.yaml
```
**Add to pubspec.yaml:**
```yaml theme={null}
dependencies:
amity_uikit_beta_service:
git:
url: https://github.com/YOUR_USERNAME/Amity-Social-UIKit-Flutter-Opensource.git
ref: main # or specific branch/tag
```
**Add as submodule:**
```bash theme={null}
cd YourFlutterProject
git submodule add https://github.com/YOUR_USERNAME/Amity-Social-UIKit-Flutter-Opensource.git packages/amity_uikit
git submodule update --init --recursive
```
**Update pubspec.yaml:**
```yaml theme={null}
dependencies:
amity_uikit_beta_service:
path: packages/amity_uikit
```
### Initialization
```dart theme={null}
import 'package:flutter/material.dart';
import 'package:amity_uikit_beta_service/amity_uikit.dart';
import 'package:amity_uikit_beta_service/v4/utils/config_provider_widget.dart';
void main() async {
WidgetsFlutterBinding.ensureInitialized();
// Initialize UIKit
await AmityUIKit().setup(
apikey: 'YOUR_API_KEY',
region: AmityEndpointRegion.eu,
);
runApp(MyApp());
}
class MyApp extends StatelessWidget {
@override
Widget build(BuildContext context) {
return AmityUIKitProvider(
child: SocialHomePageConfigProviderWidget(),
);
}
}
```
### Customization Benefits
* **Widget Modification**: Edit Flutter widgets, screens, and navigation flows
* **Theme Customization**: Modify Material/Cupertino themes and custom styling
* **State Management**: Implement custom Provider, Bloc, or Riverpod patterns
* **Platform Channels**: Add custom platform-specific functionality
* **Build Configuration**: Control pubspec dependencies and build settings
**React Native UIKit is only available through GitHub forking** - no package installation option available.
Our UIKit includes user interfaces to enable fast integration of standard Social features into new or existing applications. The React Native UIKit supports integration with **React Native CLI**, providing you with a flexible experience to seamlessly integrate social features into your existing React Native application.
**Important**: If you'd like to use React Native Expo, please visit the [Expo repository](https://github.com/AmityCo/Amity-Social-UIKit-React-Native-OpenSource) instead.
### Minimum Requirements
* Node.js 16 or later
* JDK 17.0.10
* Ruby 3.2.0
* Xcode 15
* React Native CLI (not Expo)
### Fork Repository
1. Fork the [React Native UIKit repository](https://github.com/AmityCo/Amity-Social-UIKit-React-Native-CLI-OpenSource)
2. Clone your forked repository:
```bash theme={null}
git clone https://github.com/YOUR_USERNAME/Amity-Social-UIKit-React-Native-CLI-OpenSource.git
```
### Installation Steps
**Step 1: Build UIKit Package**
```bash theme={null}
cd Amity-Social-UIKit-React-Native-CLI-OpenSource
yarn install # or npm install
npm pack
```
This will generate `amityco-asc-react-native-ui-kit-x.x.x.tgz` file.
**Step 2: Install in Your Project**
```bash theme={null}
# Copy the .tgz file to your project folder
# Then install the UIKit and peer dependencies
yarn add ./amityco-asc-react-native-ui-kit-x.x.x.tgz
# Install required peer dependencies
yarn add react-native-safe-area-context react-native-image-picker @react-native-async-storage/async-storage react-native-svg react-native-gesture-handler react-native-screens react-native-video@6.0.0-beta.6 react-native-create-thumbnail @react-native-community/netinfo @react-navigation/native @react-navigation/native-stack @react-navigation/stack react-native-vision-camera react-native-push-notification @api.video/react-native-livestream@2.0.0 react-native-get-random-values react-native-rsa-native react-native-vlc-media-player react-native-fs@2.20.0 @react-native-community/datetimepicker@7.1.0
```
### Platform Configuration
**iOS Configuration (ios/Podfile):**
```ruby theme={null}
platform :ios, '12.0' # Minimum iOS 12.0
target 'YourApp' do
config = use_native_modules!
# Required for UIKit functionality
pod 'SPTPersistentCache', :modular_headers => true
pod 'DVAssetLoaderDelegate', :modular_headers => true
$RNVideoUseVideoCaching = true
# Your other dependencies...
end
```
**iOS Deployment Target:**
* In Xcode, set **Minimum Deployments** to at least **iOS 12.0**
**Install iOS dependencies:**
```bash theme={null}
npx pod-install
```
**Android Configuration (android/build.gradle):**
```gradle theme={null}
buildscript {
ext {
kotlinVersion = "1.7.0" // 1.7.0 or above
compileSdkVersion = 34
buildToolsVersion = "34.0.0"
// ... other configurations
}
}
```
### Required Permissions
**iOS Permissions (ios/YourApp/Info.plist):**
```xml theme={null}
NSCameraUsageDescription
App needs access to the camera to take photos
NSMicrophoneUsageDescription
App needs access to the microphone to record audio
NSPhotoLibraryUsageDescription
App needs access to the gallery to select photos
```
**Android Permissions (android/app/src/main/AndroidManifest.xml):**
```xml theme={null}
```
### Basic Usage
**Simple Integration:**
```jsx theme={null}
import React from 'react';
import {
AmityUiKitSocial,
AmityUiKitProvider,
} from 'amity-react-native-social-ui-kit';
export default function App() {
return (
);
}
```
### Individual Screen Components
UIKit supports importing and rendering individual screens for more granular control:
**Available Screens:**
* `CommunityHome`
* `PostDetail`
* `AmityExploreComponent`
**Usage with Individual Screens:**
```jsx theme={null}
import React from 'react';
import {
AmityUiKitProvider,
AmityPageRenderer, // Required for individual screens
CommunityHome,
PostDetail,
} from 'amity-react-native-social-ui-kit';
export default function App() {
return (
);
}
```
**Note**: `AmityPageRenderer` is only required when using individual screen components. It's not needed for the `AmityUiKitSocial` component.
### React Navigation v7 Migration
If you're upgrading to React Navigation v7, follow these steps:
**1. Upgrade Dependencies:** Update these packages to match UIKit's exact versions in `package.json`:
* `@react-navigation/native`
* `@react-navigation/native-stack`
* `@react-navigation/stack`
* `react-native-screens`
**`2. Replace independent={true} with NavigationIndependentTree:`**
**Before:**
```jsx theme={null}
{/* Your navigators */}
```
**After:**
```jsx theme={null}
import { NavigationIndependentTree } from '@react-navigation/native';
{/* Your navigators */}
```
### Try Sample App
The repository includes a built-in sample app for testing:
**1. Setup Sample App:**
```bash theme={null}
cd example
yarn install
```
**2. Configure Firebase (for push notifications):**
* Set up Firebase project at [https://console.firebase.google.com/](https://console.firebase.google.com/)
* Download `google-services.json` and `GoogleService-Info.plist`
* Copy to `/example/android/app/` and `/example/ios/` respectively
**3. Configure App Settings:** Edit `/example/src/App.tsx` with your credentials:
* `apiKey`
* `apiRegion`
* `apiEndpoint`
* `userId`
* `displayName`
* `fcmToken`
**4. Run Sample App:**
```bash theme={null}
# From root directory
yarn install
# Run iOS
yarn example ios
# Run Android
yarn example android
```
### Customization Benefits
* **Complete Component Control**: Modify React Native components, screens, and navigation flows
* **Advanced Styling**: Override StyleSheet styles and implement custom theme configurations
* **Individual Screen Usage**: Import and use specific screens for granular control
* **Native Module Integration**: Add custom native modules and third-party libraries
* **Navigation Flexibility**: Customize React Navigation flows and screen transitions
* **State Management**: Implement custom Redux/Context state management patterns
* **Push Notifications**: Full control over Firebase configuration and notification handling
***
## Next Steps
After installation, continue with:
Configure user authentication and API credentials
Add your first UIKit component to your app
Customize themes, colors, and styling
**Installation Complete?** Head to [Authentication
Setup](/uikit/getting-started/authentication) to configure your API
credentials and start building!