> ## Documentation Index
> Fetch the complete documentation index at: https://learn.social.plus/llms.txt
> Use this file to discover all available pages before exploring further.
# Tag Management
> Create, organize, and assign custom tags to users for streamlined segmentation, filtering, and community management
Organize your user base with custom tags that make segmentation, search, and bulk operations effortless. Tag Management lets you create labeled categories — from "Verified ✅" to "New Joiner" — and assign them to users directly or in bulk, so you can filter, track, and act on specific groups instantly.
Define custom tags with name, color, and description
Tag individual users or assign in bulk
Instantly find users by tag on Manage Users
Set background and text colors for visual distinction
Find tags quickly by name or ID
Edit, delete, and track tag usage over time
## Overview
As your community grows, managing users at scale requires more than just names and roles. Tag Management provides a flexible labeling system that lets you categorize users by any criteria meaningful to your organization — expertise areas, membership tiers, geographic regions, behavioral segments, or program participation.
Tags appear directly in the **Manage Users** table, can be used as filters to narrow down user lists, and are visible on individual tag detail pages where you can see and manage all assigned users at a glance.
### Key Benefits
Create unlimited tags for any categorization need — roles, regions, programs, behaviors, or custom segments
Color-coded tags make it easy to spot user groups at a glance in the Manage Users table
Filter the entire user base by one or more tags (up to 10 simultaneously) to quickly find target groups
Manage all tags from a single page — create, edit, assign users, and track usage in one place
## Accessing Tag Management
In the sidebar, click **Users** to expand the submenu
Click **Tag management** from the expanded Users submenu
View all existing tags in a sortable table with name, ID, description, user count, and timestamps
## Tag Management List
The main Tag Management page displays all tags in a table with the following columns:
| Column | Description |
| ---------------- | --------------------------------------------------------- |
| **Tag name** | The display name of the tag (sortable) |
| **Tag ID** | Unique identifier for API and SDK integration |
| **Description** | Optional explanation of the tag's purpose |
| **Users** | Number of users currently assigned to this tag (sortable) |
| **Created at** | Timestamp when the tag was created (sortable) |
| **Last updated** | Timestamp of the most recent modification (sortable) |
| **Action** | Edit and more options (edit tag, copy tag ID, delete) |
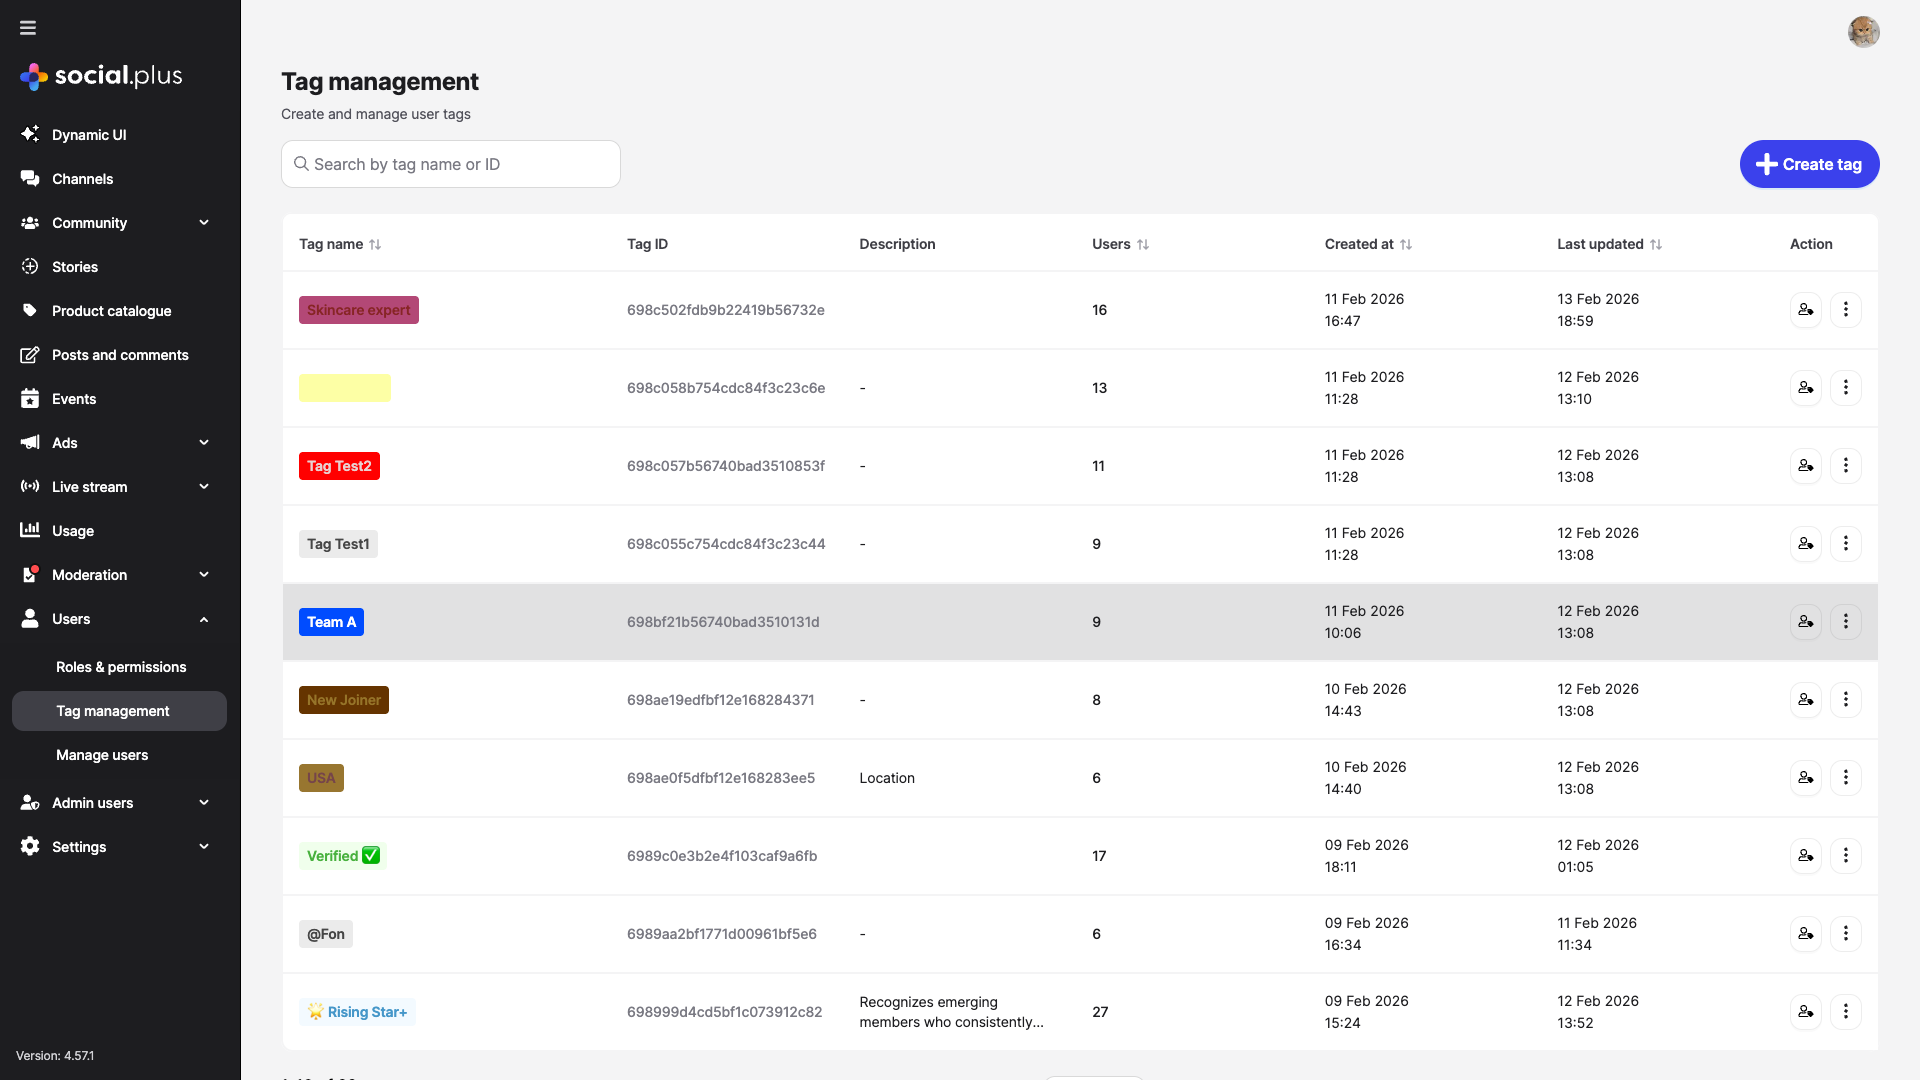 You can **search** for tags by name or ID using the search bar at the top of the table.
## Creating a Tag
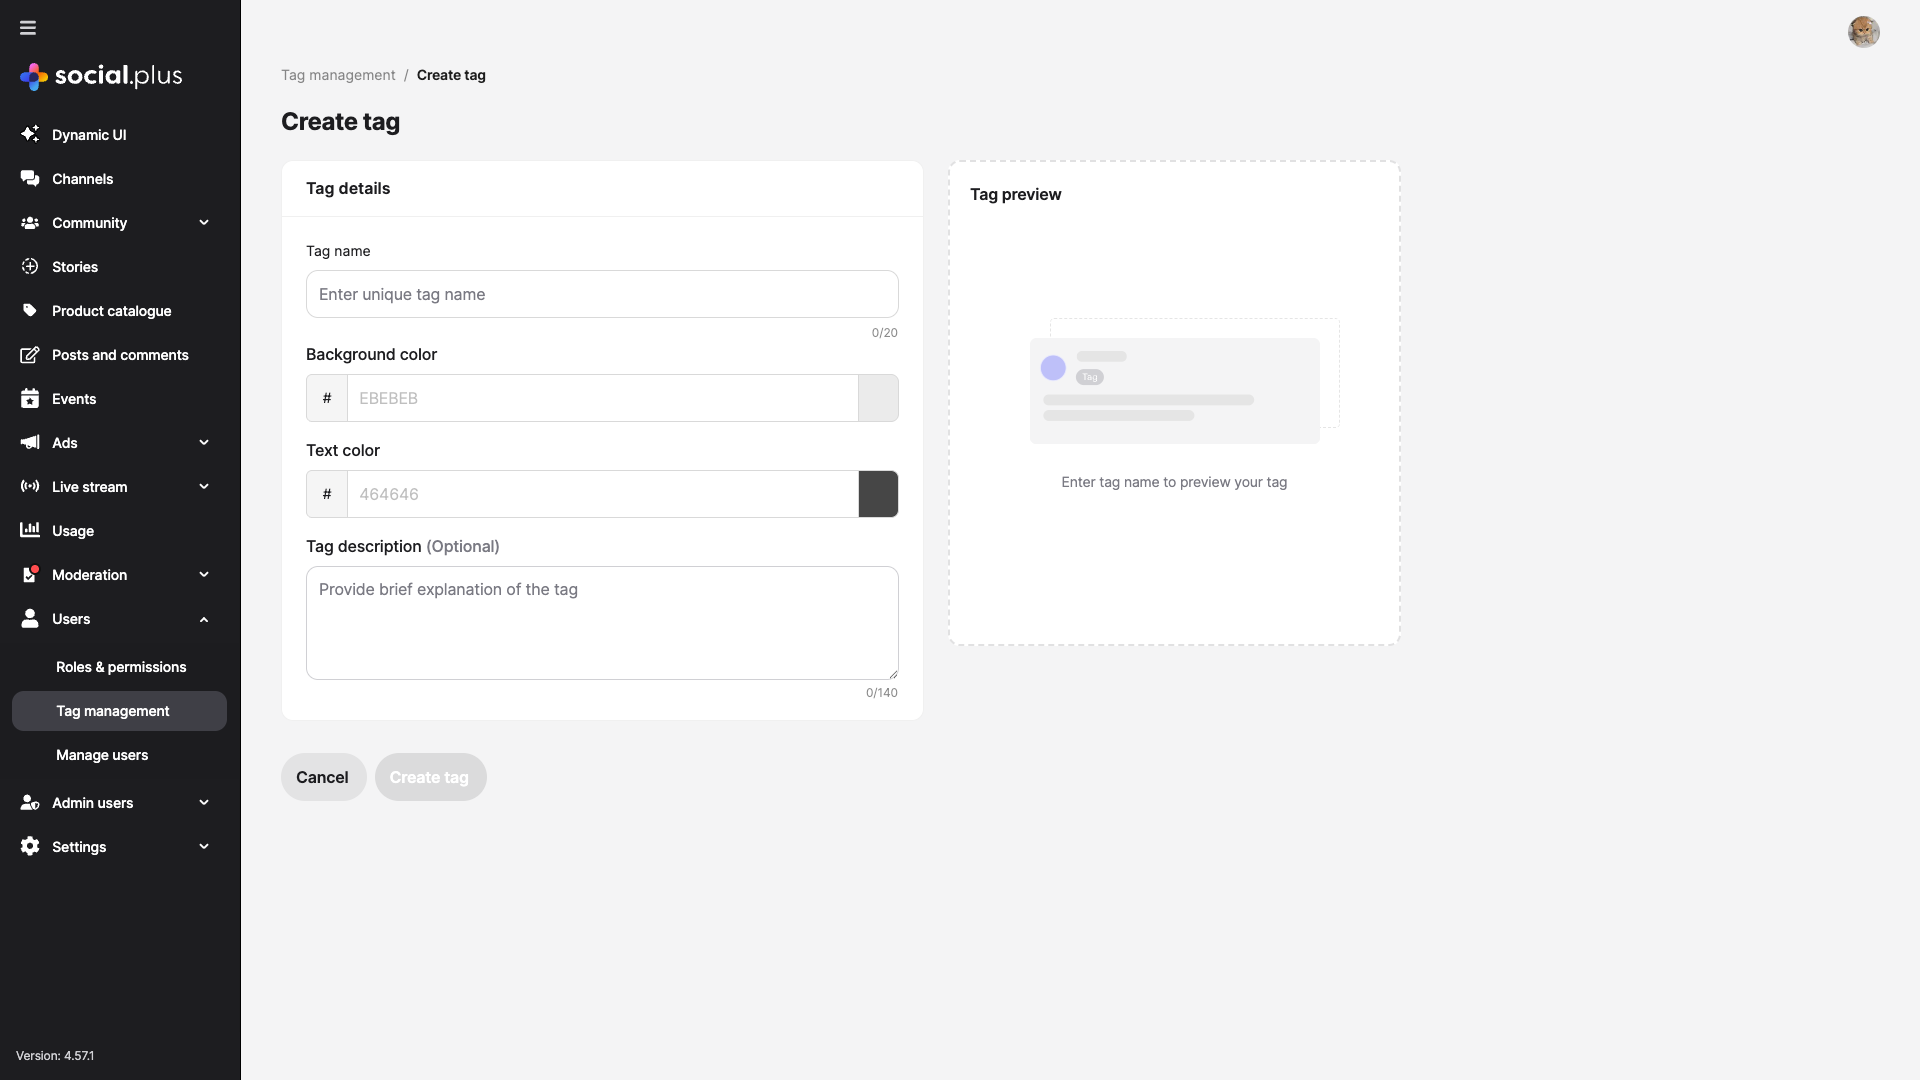
Click the **Create tag** button in the top-right corner of the Tag Management page
Fill in the tag creation form:
* **Tag name** (required): A unique name up to 20 characters
* **Background color**: Hex color code for the tag background (default: `#EBEBEB`)
* **Text color**: Hex color code for the tag text (default: `#464646`)
* **Tag description** (optional): A brief explanation up to 140 characters
Click **Save** to create the tag. It will immediately appear in the Tag Management list and become available for assignment.
You can **search** for tags by name or ID using the search bar at the top of the table.
## Creating a Tag
Click the **Create tag** button in the top-right corner of the Tag Management page
Fill in the tag creation form:
* **Tag name** (required): A unique name up to 20 characters
* **Background color**: Hex color code for the tag background (default: `#EBEBEB`)
* **Text color**: Hex color code for the tag text (default: `#464646`)
* **Tag description** (optional): A brief explanation up to 140 characters
Click **Save** to create the tag. It will immediately appear in the Tag Management list and become available for assignment.
 ### Tag Creation Parameters
**Type:** `string`
**Required:** Yes
**Max length:** 20 characters
The display name shown in the tag list, user profiles, and filter dropdowns. Must be unique across all tags.
**Examples:** `Verified ✅`, `New Joiner`, `Skincare expert`, `Team A`, `USA`
**Type:** Hex color code
**Required:** No
**Default:** `#EBEBEB`
The background fill color of the tag badge. Use contrasting colors to make tags visually distinct.
**Type:** Hex color code
**Required:** No
**Default:** `#464646`
The text color displayed on top of the background. Ensure sufficient contrast for readability.
**Type:** `string`
**Required:** No
**Max length:** 140 characters
An optional explanation of the tag's purpose. Visible in the tag list table to help team members understand each tag's intent.
**Example:** *"Recognizes emerging members who consistently contribute and show strong engagement within the community."*
## Editing a Tag
On the Tag Management list, click the **more options** button (⋯) in the Action column for the tag you want to edit
Choose **Edit tag** from the dropdown menu
Update the tag name, colors, or description as needed on the tag detail page
On the tag detail page, you can also view, search, assign, and remove users directly
### Tag Creation Parameters
**Type:** `string`
**Required:** Yes
**Max length:** 20 characters
The display name shown in the tag list, user profiles, and filter dropdowns. Must be unique across all tags.
**Examples:** `Verified ✅`, `New Joiner`, `Skincare expert`, `Team A`, `USA`
**Type:** Hex color code
**Required:** No
**Default:** `#EBEBEB`
The background fill color of the tag badge. Use contrasting colors to make tags visually distinct.
**Type:** Hex color code
**Required:** No
**Default:** `#464646`
The text color displayed on top of the background. Ensure sufficient contrast for readability.
**Type:** `string`
**Required:** No
**Max length:** 140 characters
An optional explanation of the tag's purpose. Visible in the tag list table to help team members understand each tag's intent.
**Example:** *"Recognizes emerging members who consistently contribute and show strong engagement within the community."*
## Editing a Tag
On the Tag Management list, click the **more options** button (⋯) in the Action column for the tag you want to edit
Choose **Edit tag** from the dropdown menu
Update the tag name, colors, or description as needed on the tag detail page
On the tag detail page, you can also view, search, assign, and remove users directly
 ### Tag Detail Page
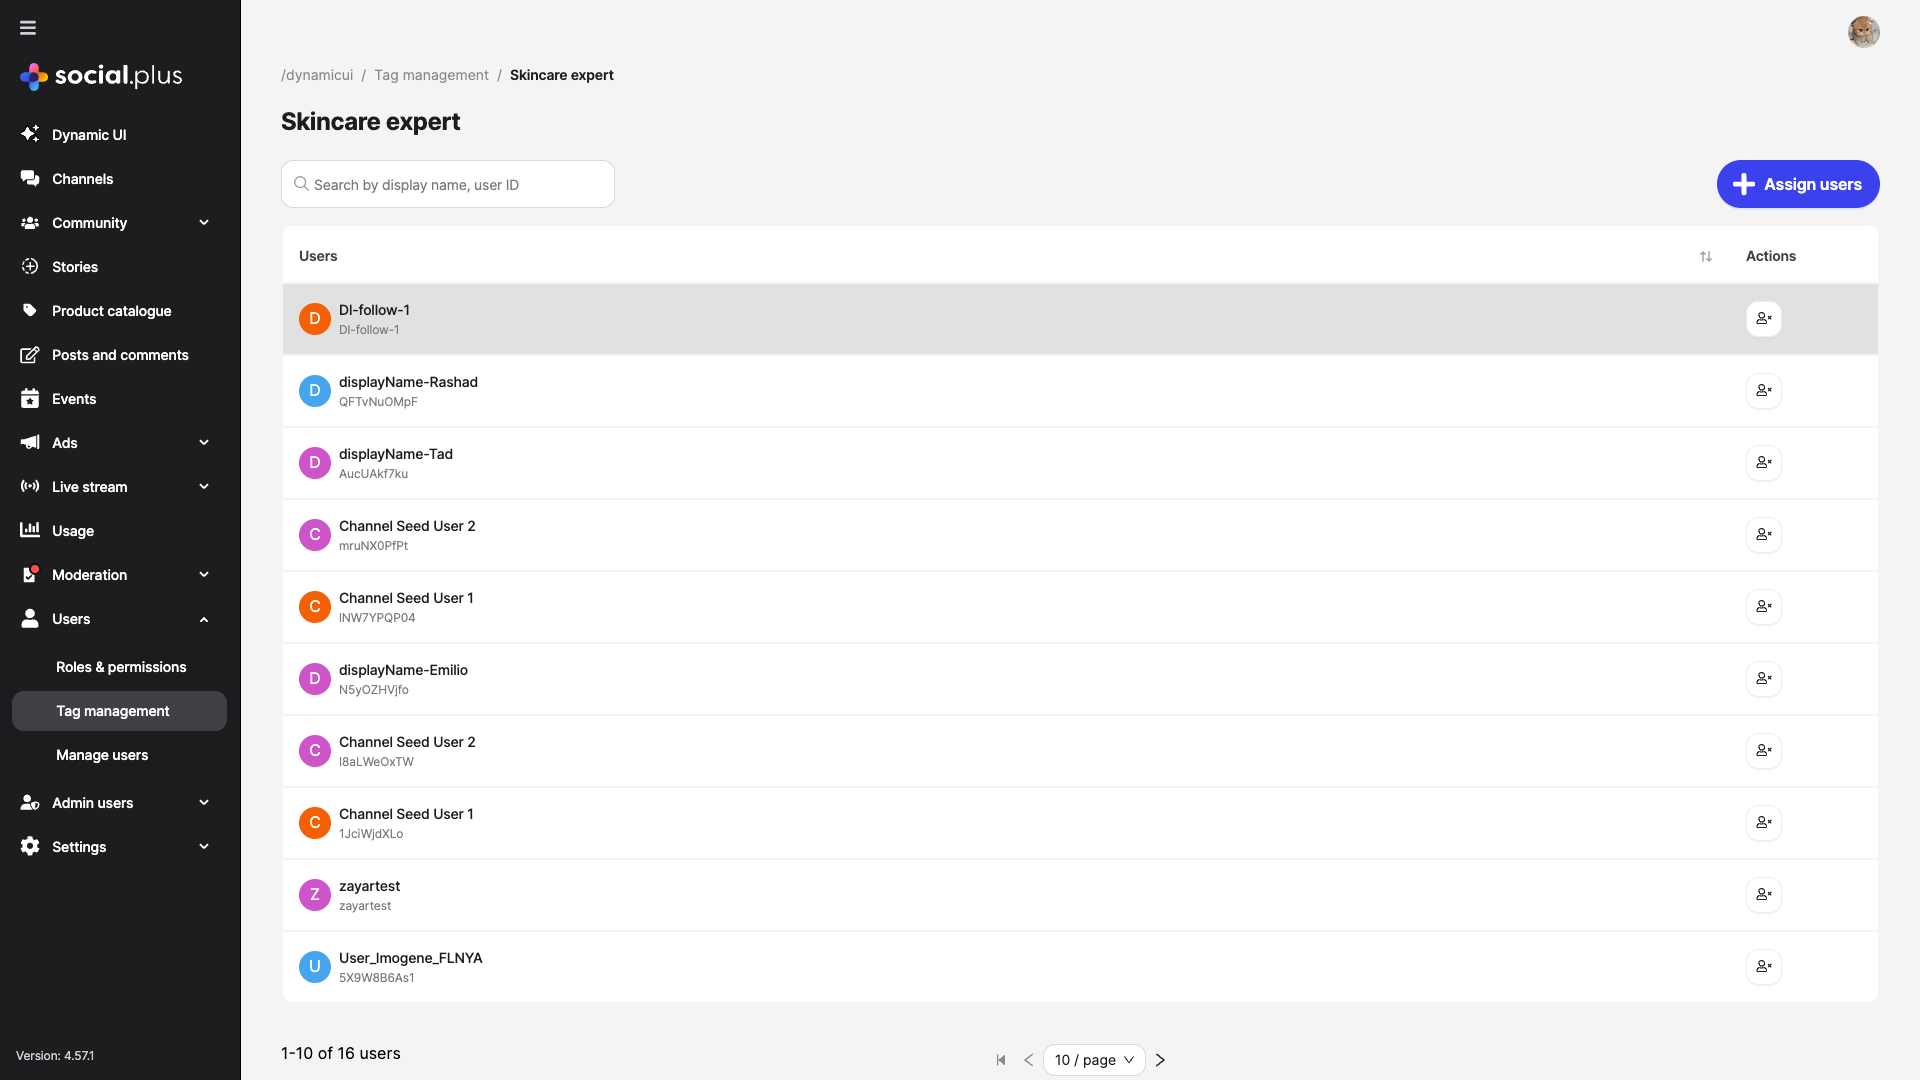
When you open a tag for editing, the detail page shows:
* **Breadcrumb navigation**: Tag management → Tag name
* **Tag header**: The tag's display name
* **Search bar**: Search assigned users by display name or user ID
* **Assign users button**: Add new users to this tag
* **User table**: Lists all assigned users with a remove action for each
* **Pagination**: Navigate through assigned users (with configurable page size)
## Assigning Users to Tags
You can assign users to tags from the tag detail page:
Navigate to the tag detail page by clicking **Edit tag** from the more options menu
Click the **Assign users** button at the top of the user list
Search for users by display name or user ID, then select the users you want to tag
The selected users will be immediately assigned to the tag and appear in the user list
### Removing Users from Tags
To remove a user from a tag, click the **remove** button (trash icon) next to the user's name on the tag detail page. The user will be untagged immediately.
## Deleting a Tag
Click the more options button (⋯) for the tag you want to delete
Choose **Delete this tag** from the dropdown menu
A confirmation dialog will appear with the message: *"Deleting this tag will remove it from all users it is currently assigned to. This action cannot be undone."*
Click **Delete** to permanently remove the tag, or **Cancel** to keep it
### Tag Detail Page
When you open a tag for editing, the detail page shows:
* **Breadcrumb navigation**: Tag management → Tag name
* **Tag header**: The tag's display name
* **Search bar**: Search assigned users by display name or user ID
* **Assign users button**: Add new users to this tag
* **User table**: Lists all assigned users with a remove action for each
* **Pagination**: Navigate through assigned users (with configurable page size)
## Assigning Users to Tags
You can assign users to tags from the tag detail page:
Navigate to the tag detail page by clicking **Edit tag** from the more options menu
Click the **Assign users** button at the top of the user list
Search for users by display name or user ID, then select the users you want to tag
The selected users will be immediately assigned to the tag and appear in the user list
### Removing Users from Tags
To remove a user from a tag, click the **remove** button (trash icon) next to the user's name on the tag detail page. The user will be untagged immediately.
## Deleting a Tag
Click the more options button (⋯) for the tag you want to delete
Choose **Delete this tag** from the dropdown menu
A confirmation dialog will appear with the message: *"Deleting this tag will remove it from all users it is currently assigned to. This action cannot be undone."*
Click **Delete** to permanently remove the tag, or **Cancel** to keep it
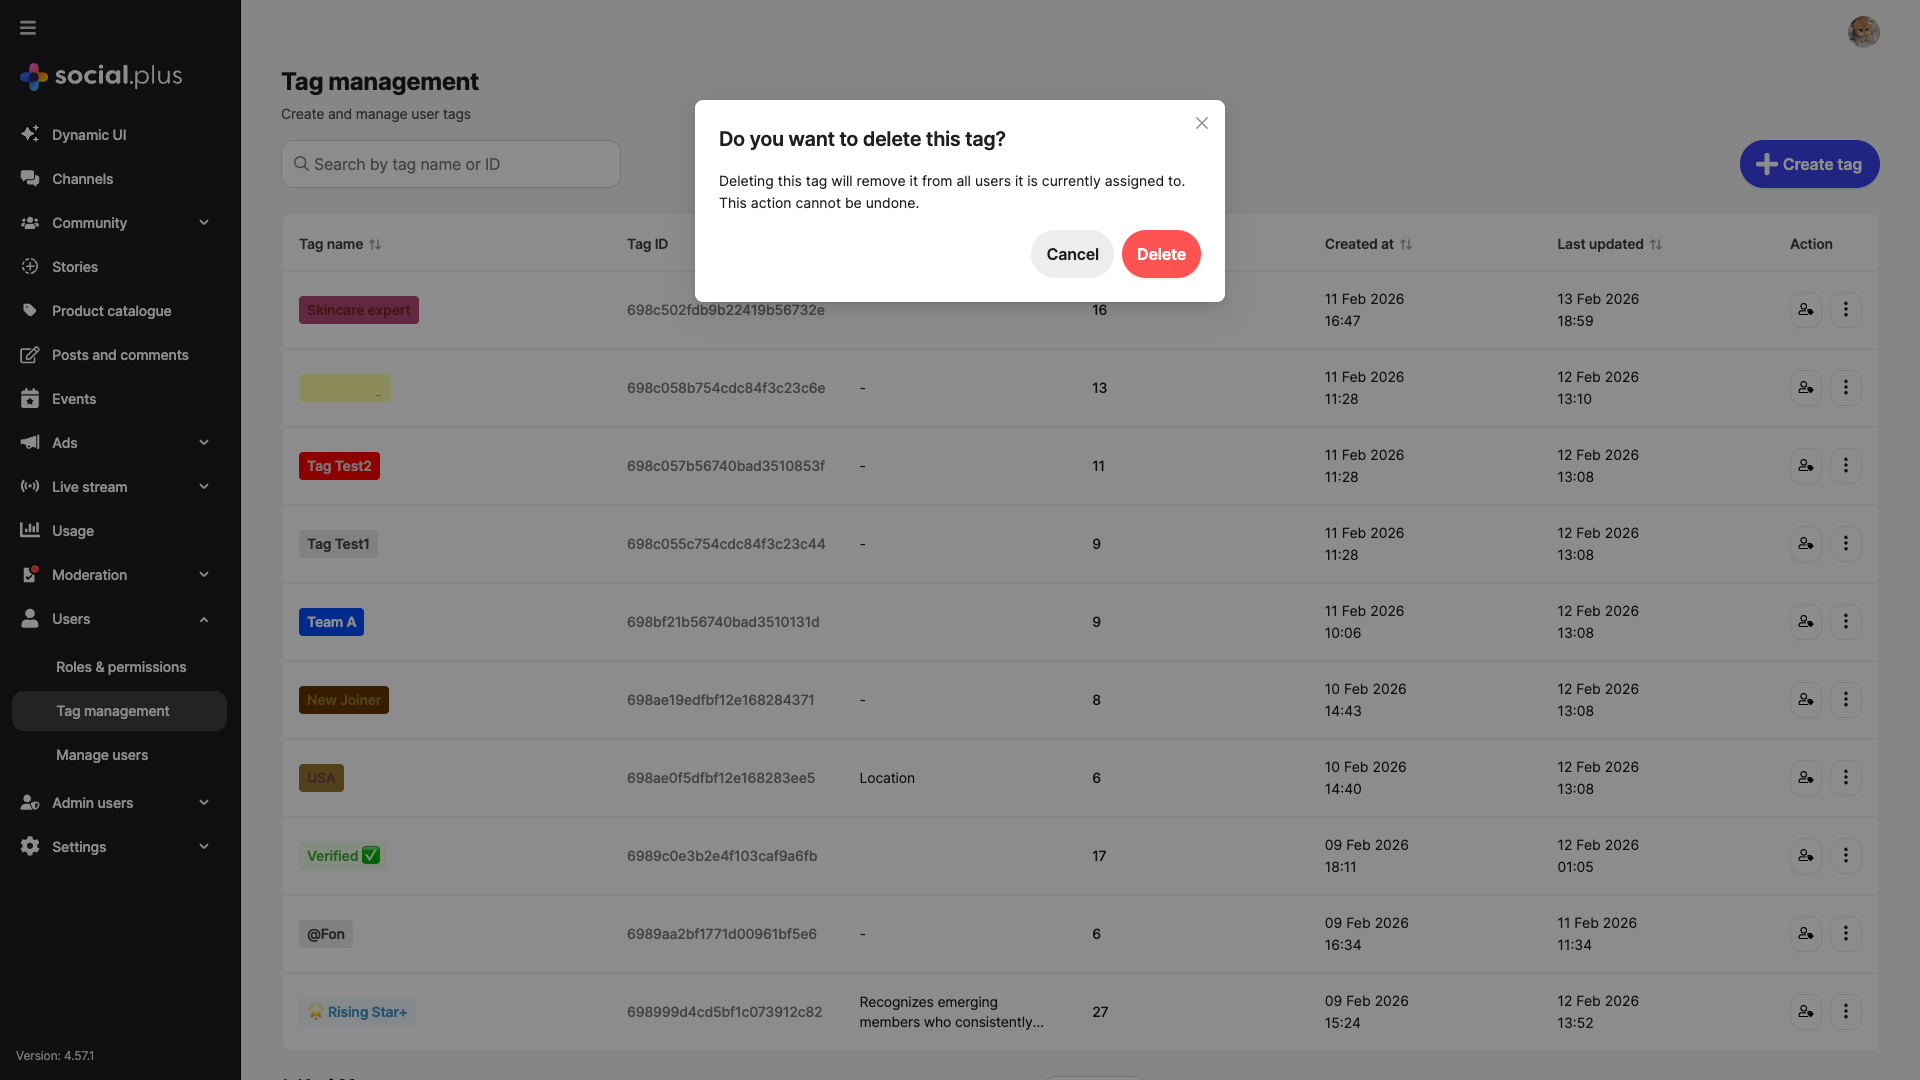 Deleting a tag is **permanent** and will remove it from all users it is currently assigned to. This action cannot be undone. Make sure you no longer need the tag before confirming deletion.
## Additional Actions
The more options menu (⋯) on each tag row provides:
| Action | Description |
| ------------------- | ---------------------------------------------------------------------------- |
| **Edit tag** | Opens the tag detail page for editing and user management |
| **Copy tag ID** | Copies the tag's unique ID to your clipboard for use in API/SDK integrations |
| **Delete this tag** | Permanently deletes the tag and removes it from all assigned users |
## Filtering Users by Tags
Tags integrate directly into the **Manage Users** page for powerful user filtering:
Sidebar → Users → Manage Users
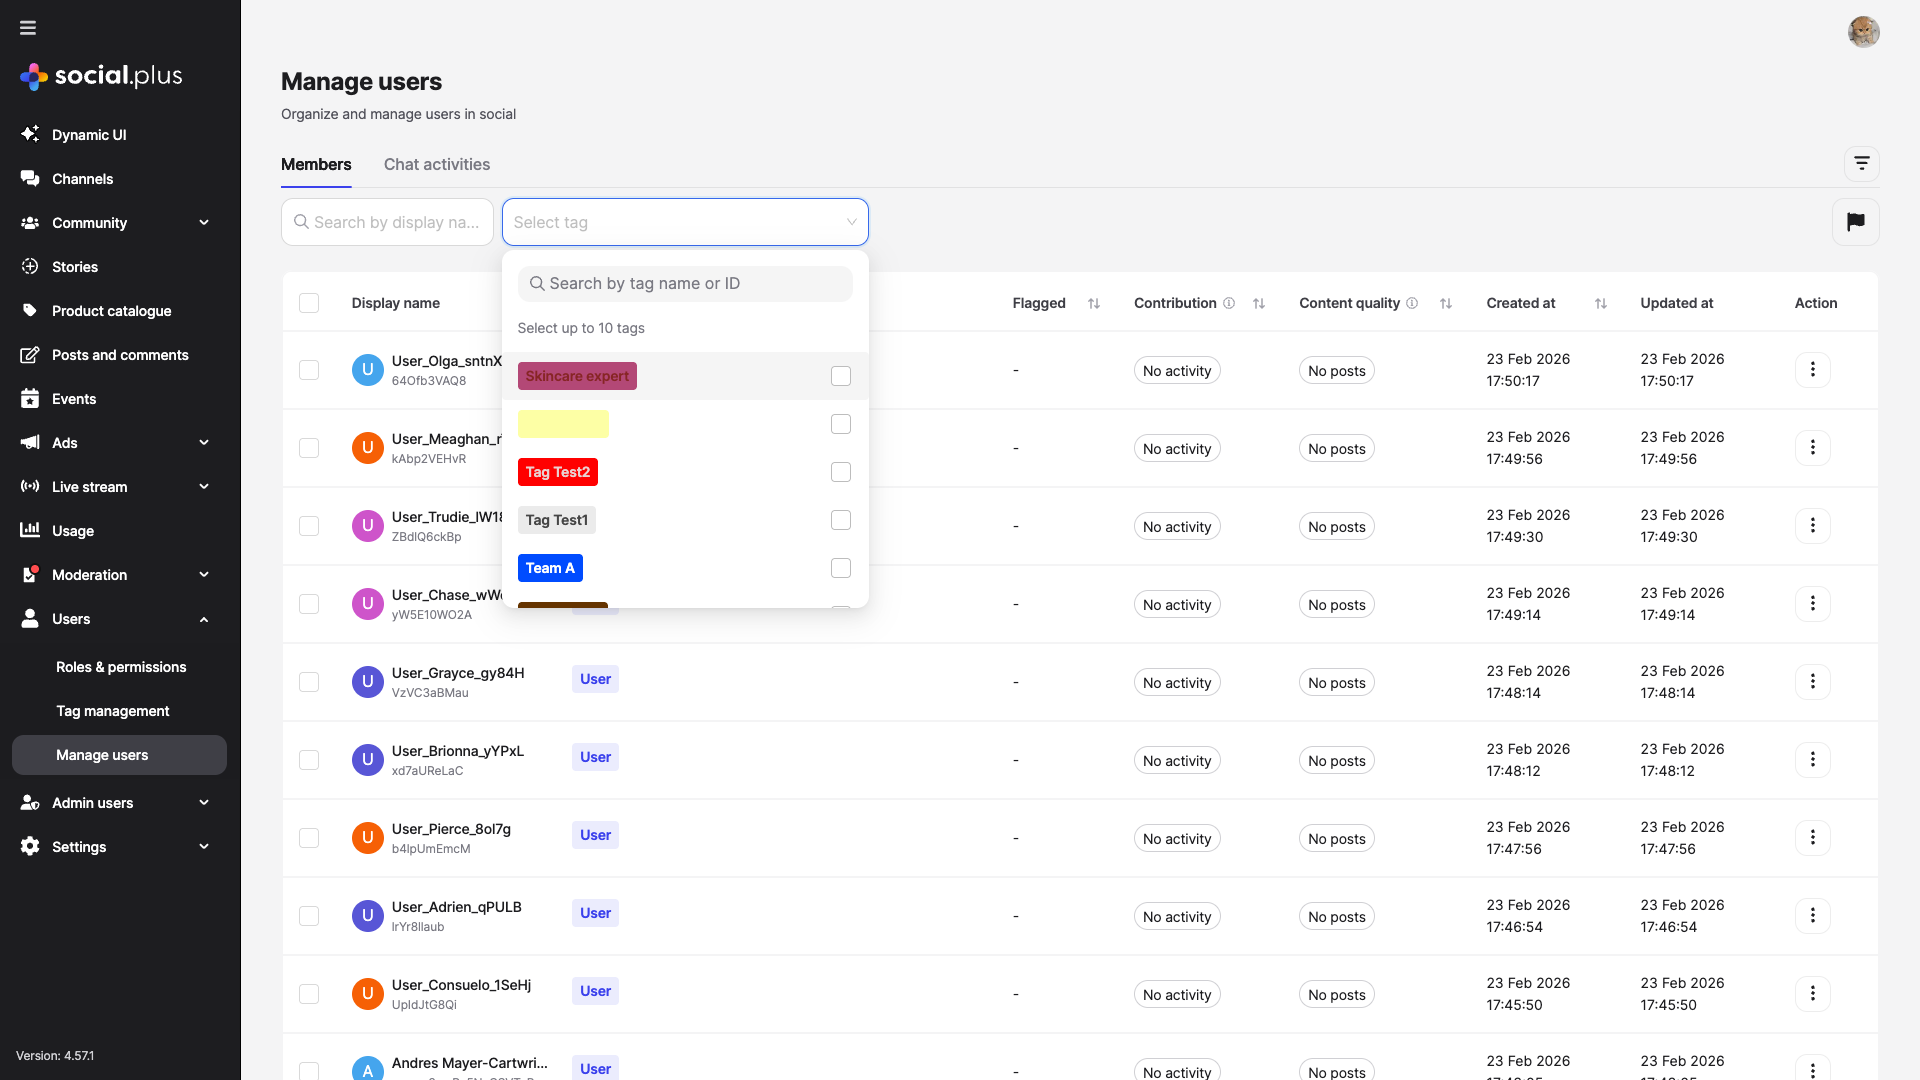
Click the **Select tag** dropdown next to the search bar
Choose one or more tags from the dropdown (up to 10 tags simultaneously). You can search by tag name or ID within the dropdown.
The user table updates to show only users matching the selected tags. The **Tag** column displays each user's assigned tags.
Deleting a tag is **permanent** and will remove it from all users it is currently assigned to. This action cannot be undone. Make sure you no longer need the tag before confirming deletion.
## Additional Actions
The more options menu (⋯) on each tag row provides:
| Action | Description |
| ------------------- | ---------------------------------------------------------------------------- |
| **Edit tag** | Opens the tag detail page for editing and user management |
| **Copy tag ID** | Copies the tag's unique ID to your clipboard for use in API/SDK integrations |
| **Delete this tag** | Permanently deletes the tag and removes it from all assigned users |
## Filtering Users by Tags
Tags integrate directly into the **Manage Users** page for powerful user filtering:
Sidebar → Users → Manage Users
Click the **Select tag** dropdown next to the search bar
Choose one or more tags from the dropdown (up to 10 tags simultaneously). You can search by tag name or ID within the dropdown.
The user table updates to show only users matching the selected tags. The **Tag** column displays each user's assigned tags.
 When a user has multiple tags assigned, the Tag column shows the first tag name along with a **+N** badge indicating the number of additional tags. Hover or click to see all assigned tags.
## Use Cases
Create tags like "Premium", "VIP", or "Free Tier" to segment users by subscription level and customize their experience
Tag subject matter experts (e.g., "Skincare expert", "Tech Guru") so community members can identify knowledgeable contributors
Use location-based tags ("USA", "APAC", "EU") to organize users by region for targeted communication or compliance
Track users enrolled in specific programs ("Beta Tester", "Ambassador", "New Joiner") for streamlined management
Combine with User Insights to tag high performers ("🌟 Rising Star+") and track them over time
Organize internal teams or external partner groups with clear, color-coded labels
## Best Practices
* Use clear, descriptive tag names that any team member can understand
* Keep names concise (under 20 characters)
* Consider using emojis for quick visual identification (e.g., ✅, 🌟, 🏆)
* Establish a consistent naming convention across your organization
* Assign distinct colors to different tag categories for quick visual scanning
* Use high-contrast text/background combinations for readability
* Reserve bright or alert colors (red, orange) for tags that need attention
* Keep neutral colors for informational or low-priority tags
* Regularly review and clean up unused tags
* Monitor the **Users** count column to identify underused tags
* Use tag descriptions to document the purpose and criteria for each tag
* Delete deprecated tags to keep the list manageable
* Combine tag filtering with Contribution Level and Content Quality filters for powerful segmentation
* Use the **Copy tag ID** action to integrate tags with your SDK or API workflows
* Assign tags during user onboarding or milestone events for consistent categorization
* Leverage tags in conjunction with User Insights to identify and reward top contributors
## Troubleshooting
**Symptoms:** A newly created tag doesn't show in the Manage Users tag filter
**Solutions:**
1. Refresh the Manage Users page
2. Verify the tag was saved successfully on the Tag Management page
3. Check that you have the correct permissions to view tags
**Symptoms:** Delete option is not available or fails
**Solutions:**
1. Ensure you have admin-level permissions
2. Confirm you're clicking the correct more options button (⋯) for the intended tag
3. Try refreshing the page and attempting again
**Symptoms:** Tag badge shows unexpected colors
**Solutions:**
1. Verify the hex color codes are valid 6-character hex values
2. Ensure you're using the `#` prefix in the color fields
3. Edit the tag and re-enter the correct color values
## Related Topics
Combine tags with contribution and content quality scoring for comprehensive user segmentation
View detailed activity history for tagged users to support moderation and recognition decisions
Review flagged content from specific user segments identified through tags
When a user has multiple tags assigned, the Tag column shows the first tag name along with a **+N** badge indicating the number of additional tags. Hover or click to see all assigned tags.
## Use Cases
Create tags like "Premium", "VIP", or "Free Tier" to segment users by subscription level and customize their experience
Tag subject matter experts (e.g., "Skincare expert", "Tech Guru") so community members can identify knowledgeable contributors
Use location-based tags ("USA", "APAC", "EU") to organize users by region for targeted communication or compliance
Track users enrolled in specific programs ("Beta Tester", "Ambassador", "New Joiner") for streamlined management
Combine with User Insights to tag high performers ("🌟 Rising Star+") and track them over time
Organize internal teams or external partner groups with clear, color-coded labels
## Best Practices
* Use clear, descriptive tag names that any team member can understand
* Keep names concise (under 20 characters)
* Consider using emojis for quick visual identification (e.g., ✅, 🌟, 🏆)
* Establish a consistent naming convention across your organization
* Assign distinct colors to different tag categories for quick visual scanning
* Use high-contrast text/background combinations for readability
* Reserve bright or alert colors (red, orange) for tags that need attention
* Keep neutral colors for informational or low-priority tags
* Regularly review and clean up unused tags
* Monitor the **Users** count column to identify underused tags
* Use tag descriptions to document the purpose and criteria for each tag
* Delete deprecated tags to keep the list manageable
* Combine tag filtering with Contribution Level and Content Quality filters for powerful segmentation
* Use the **Copy tag ID** action to integrate tags with your SDK or API workflows
* Assign tags during user onboarding or milestone events for consistent categorization
* Leverage tags in conjunction with User Insights to identify and reward top contributors
## Troubleshooting
**Symptoms:** A newly created tag doesn't show in the Manage Users tag filter
**Solutions:**
1. Refresh the Manage Users page
2. Verify the tag was saved successfully on the Tag Management page
3. Check that you have the correct permissions to view tags
**Symptoms:** Delete option is not available or fails
**Solutions:**
1. Ensure you have admin-level permissions
2. Confirm you're clicking the correct more options button (⋯) for the intended tag
3. Try refreshing the page and attempting again
**Symptoms:** Tag badge shows unexpected colors
**Solutions:**
1. Verify the hex color codes are valid 6-character hex values
2. Ensure you're using the `#` prefix in the color fields
3. Edit the tag and re-enter the correct color values
## Related Topics
Combine tags with contribution and content quality scoring for comprehensive user segmentation
View detailed activity history for tagged users to support moderation and recognition decisions
Review flagged content from specific user segments identified through tags